 Version 1.0 of the Twilight Princess Randomizer has come out a few days ago and I saw an intense need for an updated setup guide. Here's what I did to get my Gamecube game running on Dolphin. Please note that I'm not going to help you get the rom. That's on you to extract your own files from your Twilight Princess game and there's guides already out there that will help you figure out how to do that. This assumes you have the game and just want to figure out how to play the randomizer on your computer. 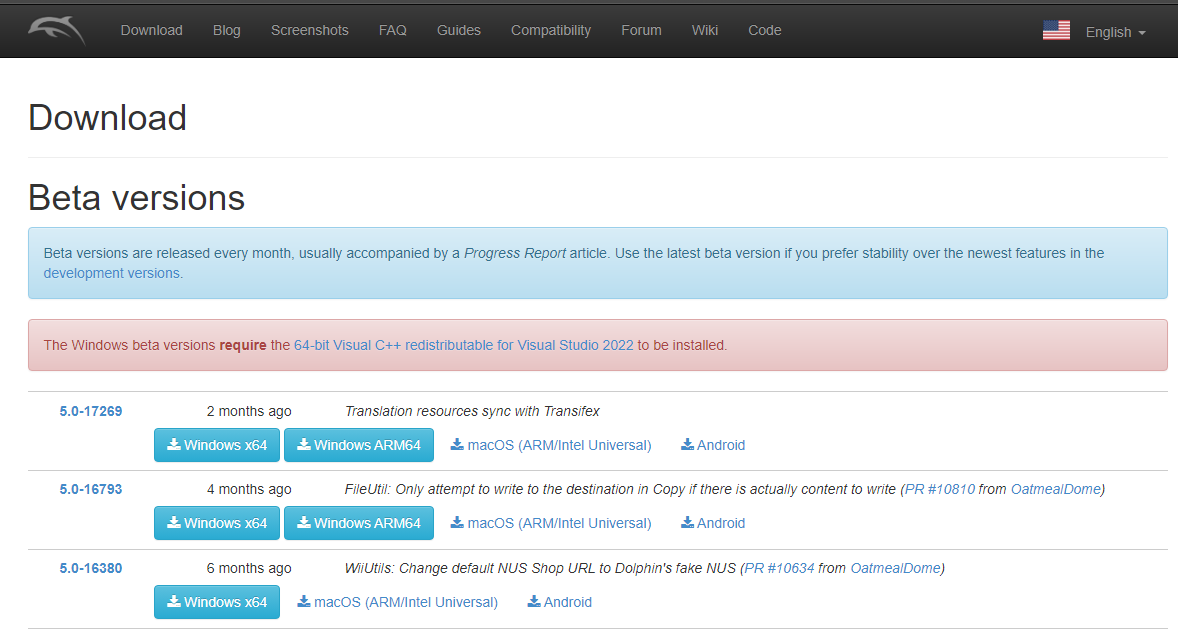 The first thing you will do is make sure you have the most up to date version of the Dolphin Emulator available. You can find the most recent version of the Dolphin Emulator here. Please note that in order for Dolphin to work, it does require the 64-bit Visual C++ redistributable for Visual Studio 2022 to be installed. This may be updated in the future so please keep an eye on the big red warning bar at the top of the window to make sure you have the pre-requisites installed. 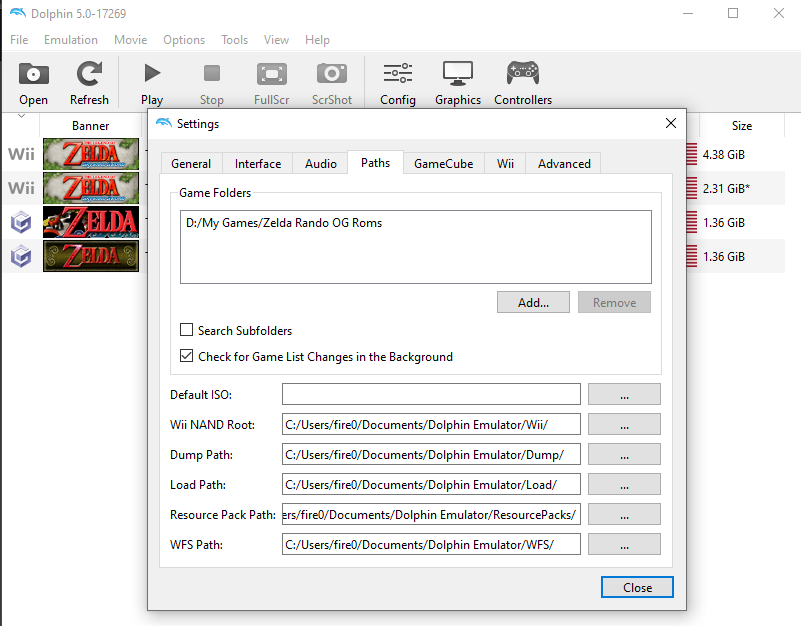 When you open Dolphin, click Config. Once in the Settings menu here, navigate to the Paths tab. Add the folder that you have your extracted game files in so they show up in the list when you open Dolphin. This step is important if you want to make sure the game doesn't lag to heck once you have loaded all of Hyrule Field. Make sure you have configured your controller by selecting the controller option on the far right of the top bar as well. 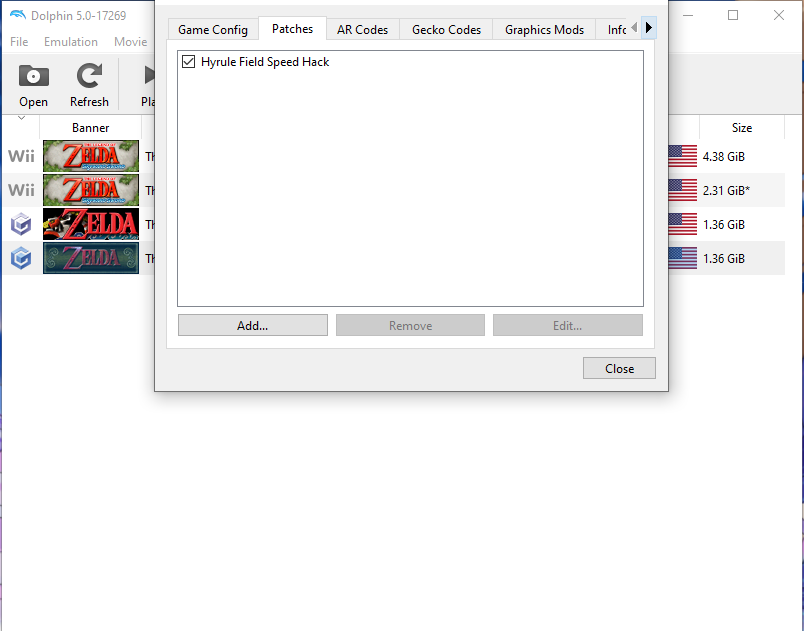 Right click the Twilight Princess game in Dolphin and select Properties. Navigate to the Patches tab and make sure Hyrule Field Hack is checked off. If this is not enabled, your game will lag to a crawl when navigating Hyrule Field after loading enough of the field for the first time. 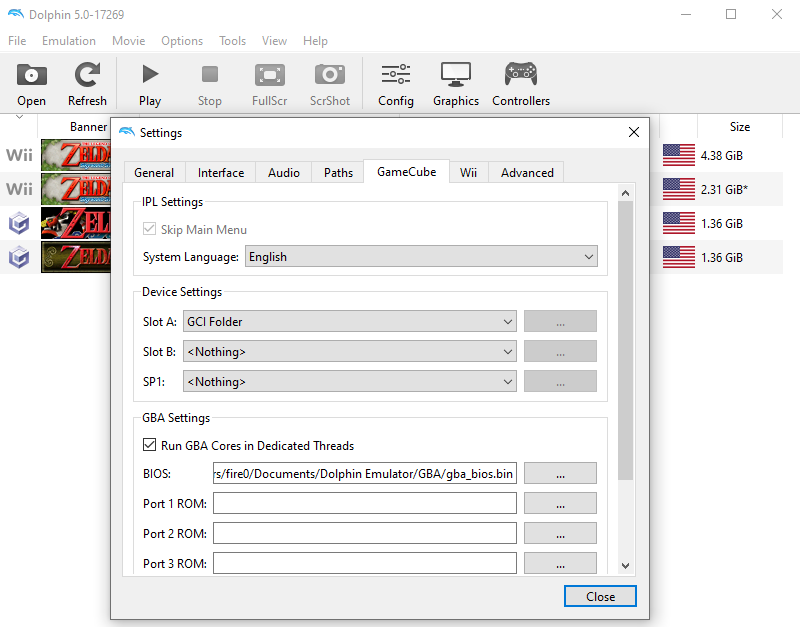 Next we are going to want to make Dolphin create a Gamecube Memory Card folder on our computer. Press the Config button on the bar at the top of Dolphin. Once in the Settings menu, navigate to the GameCube tab. Under Device Settings, select the drop down menu next to Slot A: and select GCI Folder. If you want to check if the file is made, it should default to your C://Users/Username/Documents/Dolphin Emulator/GC/USA/Card A (Please note the USA can also be JAP or EUR if you are using a different region game) 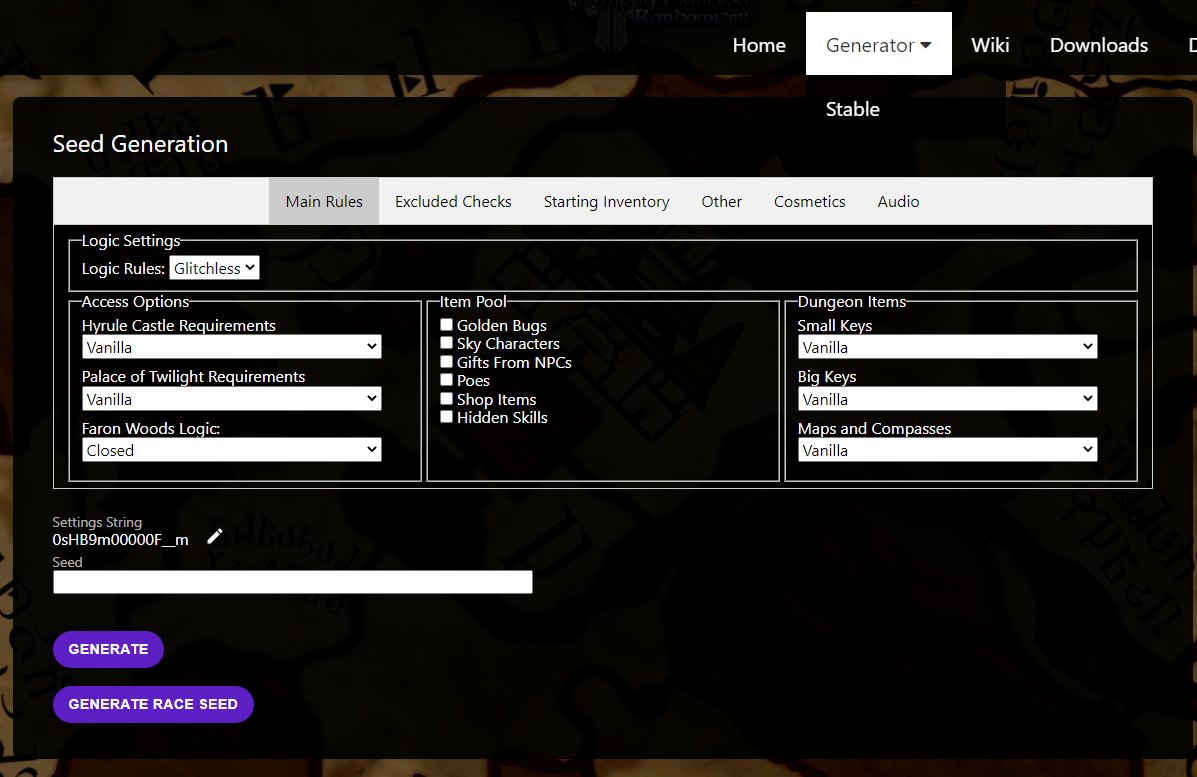 Go to the Twilight Princess Randomizer Web Generator page on the Twilight Princess Randomizer Website here. Select your each of your settings. If you hover your mouse over any of the settings, a tool tip will pop up explaining what they do so you can decide whether you want to turn them on or off. Once you have your favourite settings, note the section below the Seed Generation section that says Settings String. If you save your Settings String, the next time you play, you can copy in the settings string for the options you have selected to make this process a lot quicker. If you are participating in a tournament or race and want to practice seeds with those setting, the organizers will often post seed strings of the settings that people can use to quickly copy into the Settings String section. This will automatically fill in the settings used for those races or tournaments. Once you have all the settings selected that you want, hit the Generate button at the bottom of the Seed Generation section of this page. If you are wanting a race legal seed, make sure to hit the Generate Race Seed button instead. Please make sure that you are following all console or emulator settings that the tournament or race rules require. As these requirements change, I won't be including the rules in here so please make sure that if you are racing, you follow the guidelines they put out on what is or isn't allowed on your emulator.  Once generated, you should see a screen like this that has the seed name at the top of the screen. While here, you can still change your Cosmetic and Audio options. This enables you to share the direct link to the save file with someone else and they can change their own cosmetic and audio settings. Below the Settings Options, you will notice there are a few download options for different Regions. Select the region that matches your game file. You can tell what region your game is if you look at the Dolphin Game List and see the flag on the far right of the screen. I encourage you to keep the Spoiler Log button checked for non race seeds in case you get stuck. If you don't wish to have the spoiler log file, you can see it on the webpage if you scroll down farther. You now have your Randomizer game patch file 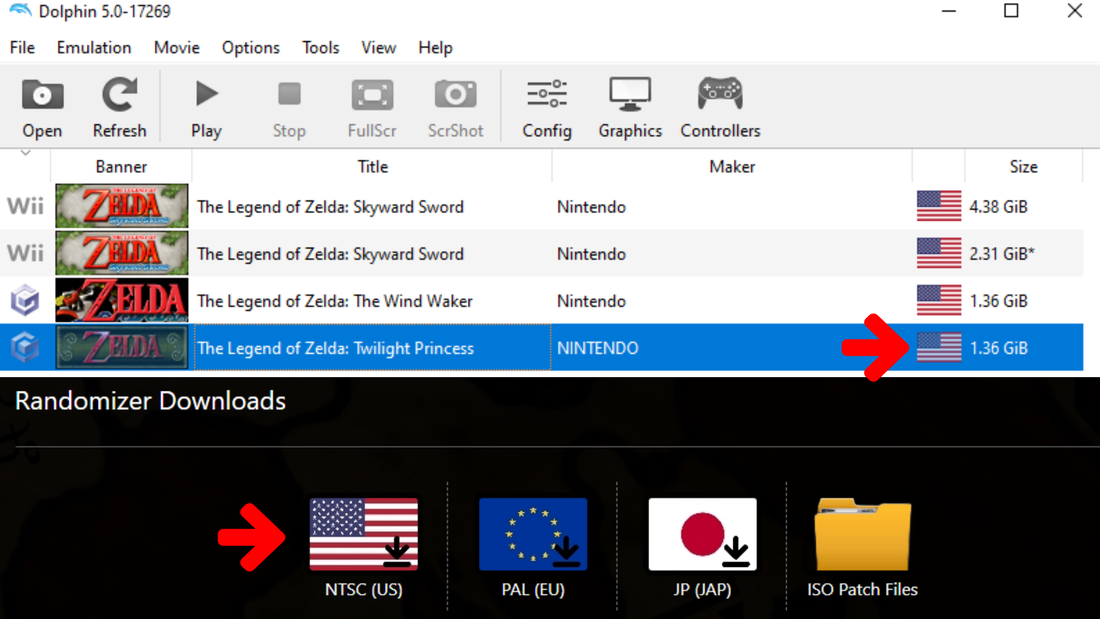 The Patch File is only 1 of the files you need to have. If you scroll down to the bottom of the Generated Seed Page, you will see a few options for Randomizer Downloads. This is also a file that is required. Make sure you download the one that matches the game type you have. My recommendation is to delete the old one and download these each time you generate a seed in case they get updated. This ensures you will never have conflicting files in your Dolphin Folder. 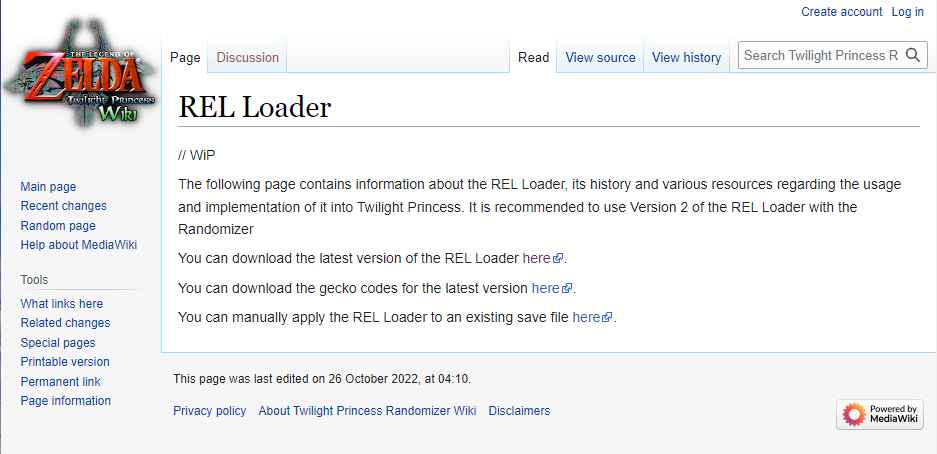 The last file you will need will be the REL Loader file. You can obtain the REL Loader here. At the time of this guide, it is recommended to use Version 2 of the REL Loader according to the Twilight Princess Randomizer Wiki (sorry I had v1 on my screenshots cause I'm a goof and copied the wrong one over for the screenshots). They will update that information if that ever changes so make sure to read what their recommendation is for which version to use.  Locate the Memory Card file you created earlier in the guide. Locate the Zip File that you downloaded that contains the Patch File and the Spoiler Log for the randomizer you generated. Extract the .gci file into the Card A folder and keep the .json spoiler log somewhere handy in case you need to look at it. Move the Randomizer.region.gci file (us, jp, eu) as well as the REL Loader .gci file you downloaded into the Card A folder as well. Your folder should look like the picture above but with the name of your seed instead of the name I have for my seed. 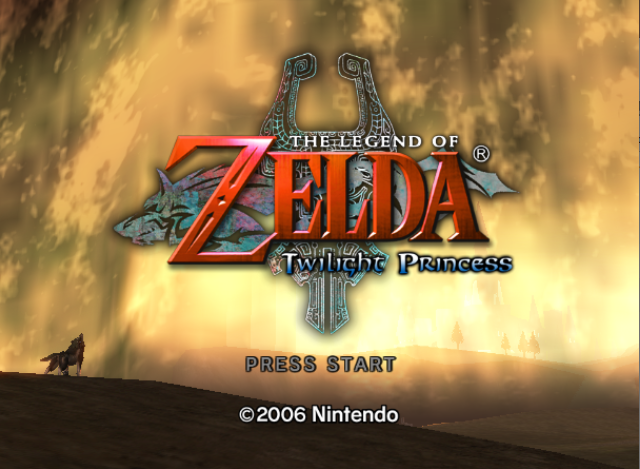 Once you have the files in the memory card folder, double click the game in Dolphin to start it. Your game should look normal like the picture above. 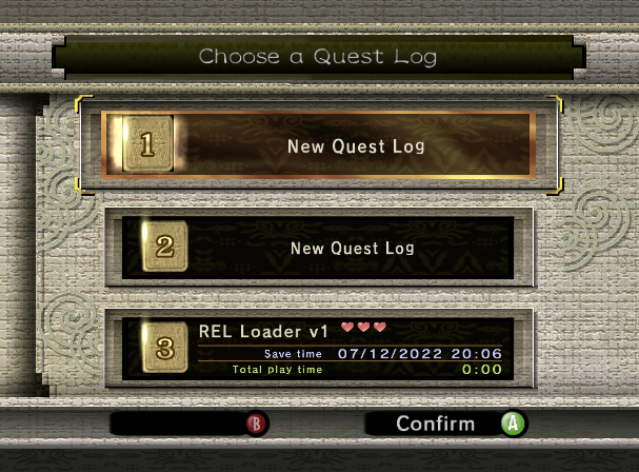 If done correctly, when you get through the warning screen and you get to the file select screen, this is what your game should look like (but with REL Loader v2 or higher). Select the REL Loader v2 file at the bottom of the screen. Select Start. 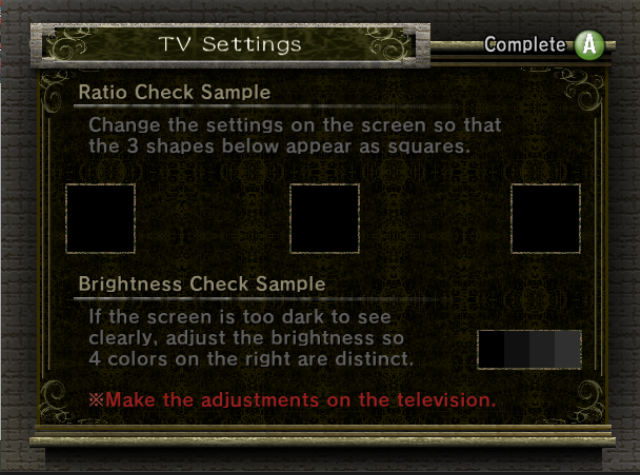 After you select Start, you will be taken to this screen. If you hit A to progress past this screen, the screen will freeze for a second and reload the game. This is intentional and means it is loading the randomizer. 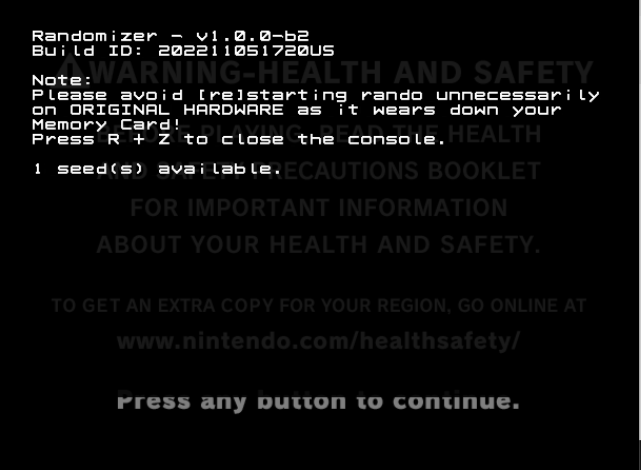 Once the randomizer is loaded, you will be brought to this screen. Press A to continue to the Save File Screen. 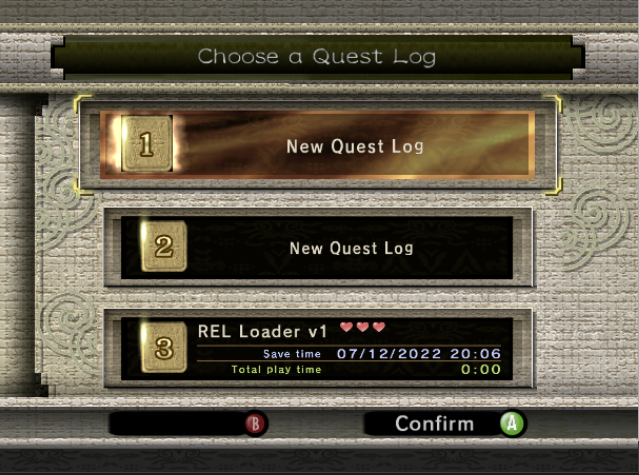 You will be back on this save screen here but now you have the randomizer loaded. You can now create a save file in Slot 1 and name Link and Epona. Once you've named them, it will once again take you to the TV Settings page where you can hit A to complete the process and continue to the game. For my first seed, I changed Link's tunic colour in the Cosmetics Settings just to show me it worked. 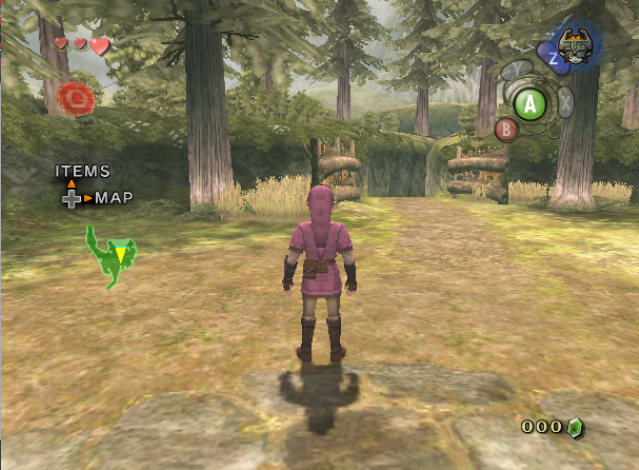 Congratulations, you now can play the randomizer! Depending on if you had chosen to skip the prologue you will either be in the prologue or standing outside your house.
Also, as far as I'm aware, there's a way to have more than one seed to choose from in Dolphin. Once I've learned how to select between multiple seeds, I'll be updating this guide. But for now, I figured it was more important to get this out as quickly as possible with the information I have for only one seed at the moment. I hope you enjoy and would love to hear your experience with the first seed you play.
0 Comments
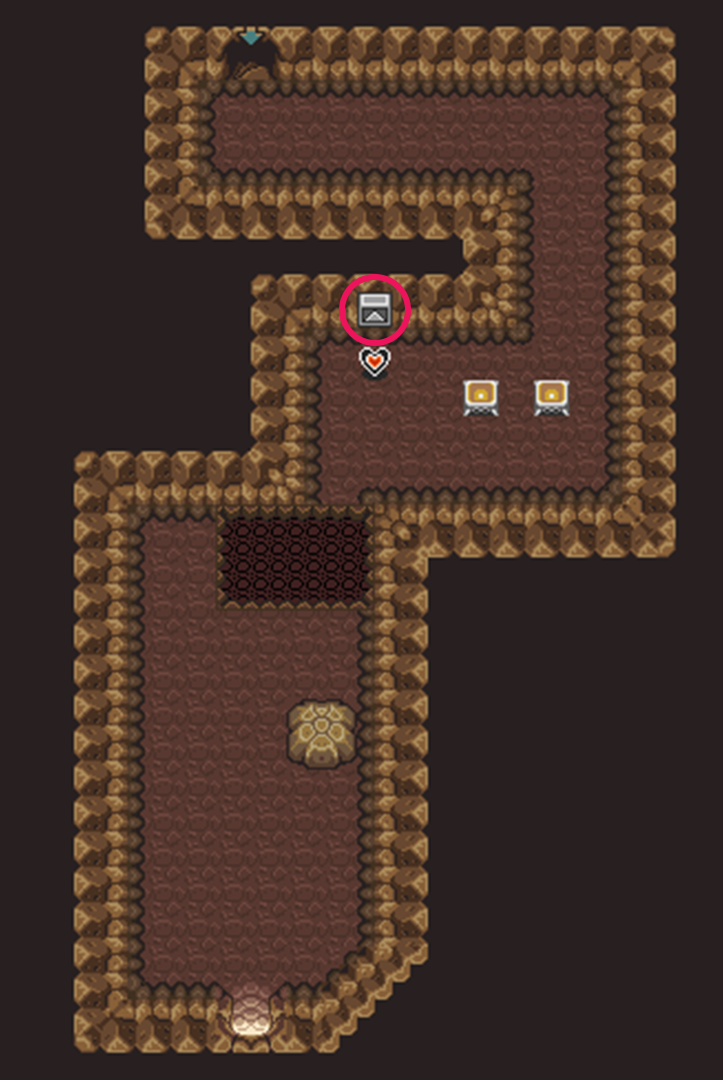
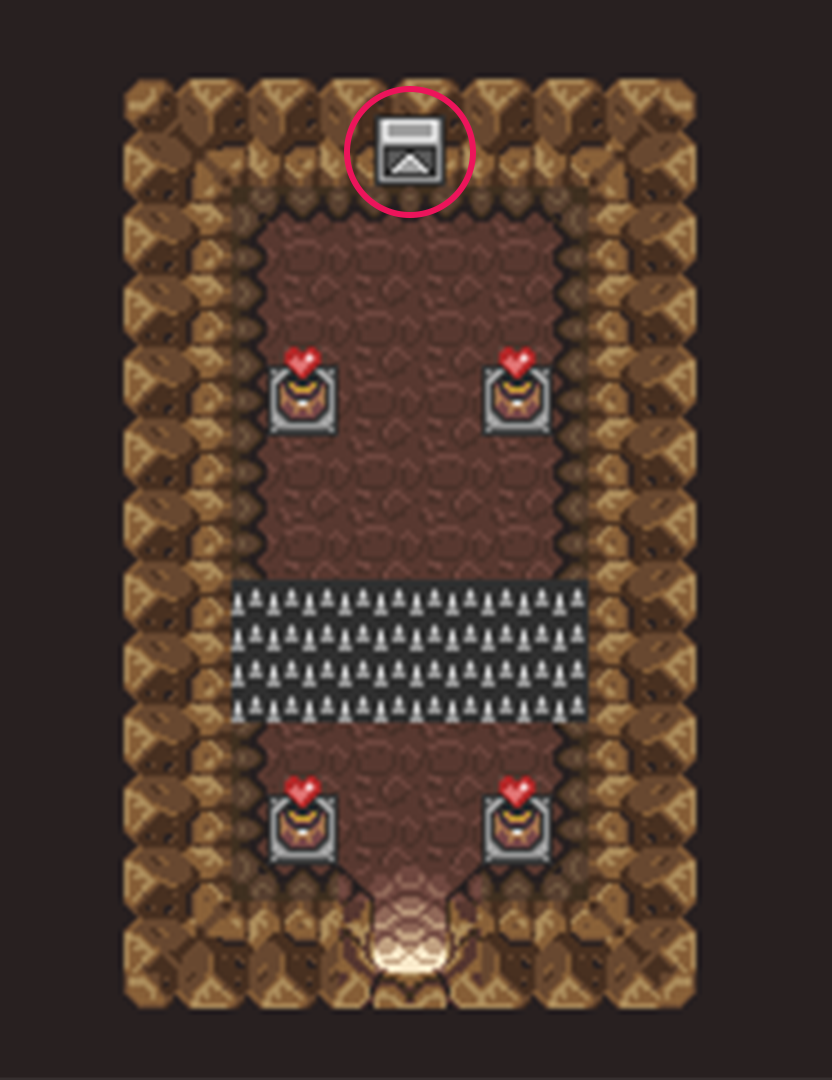
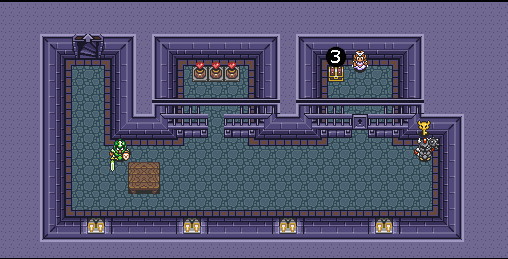
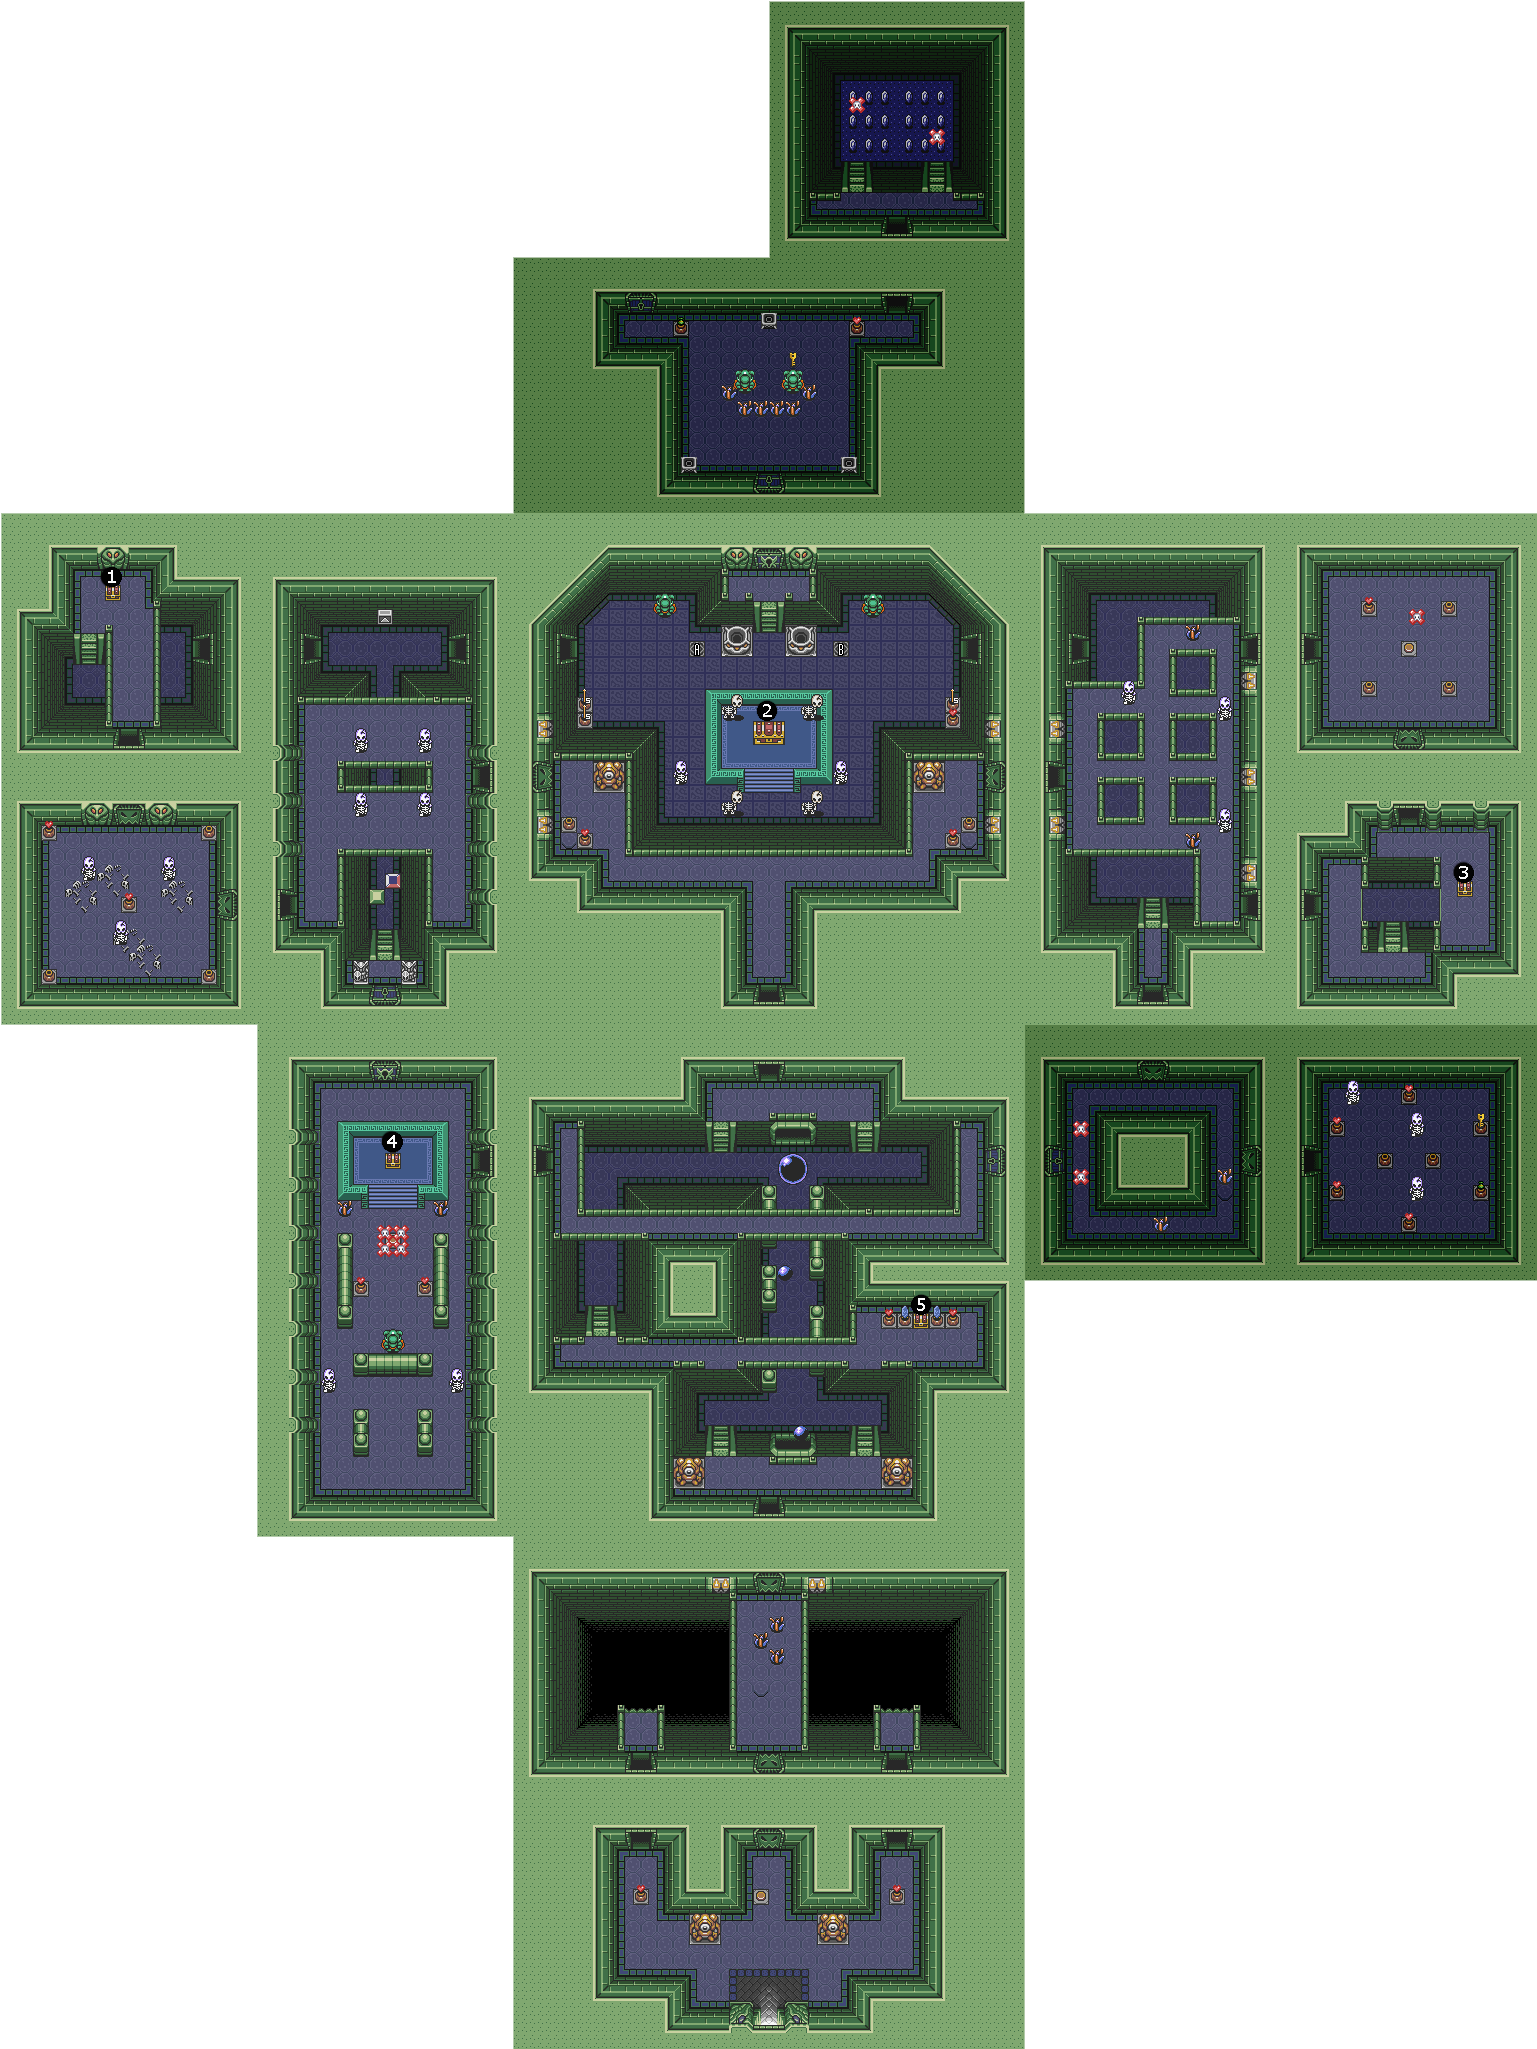
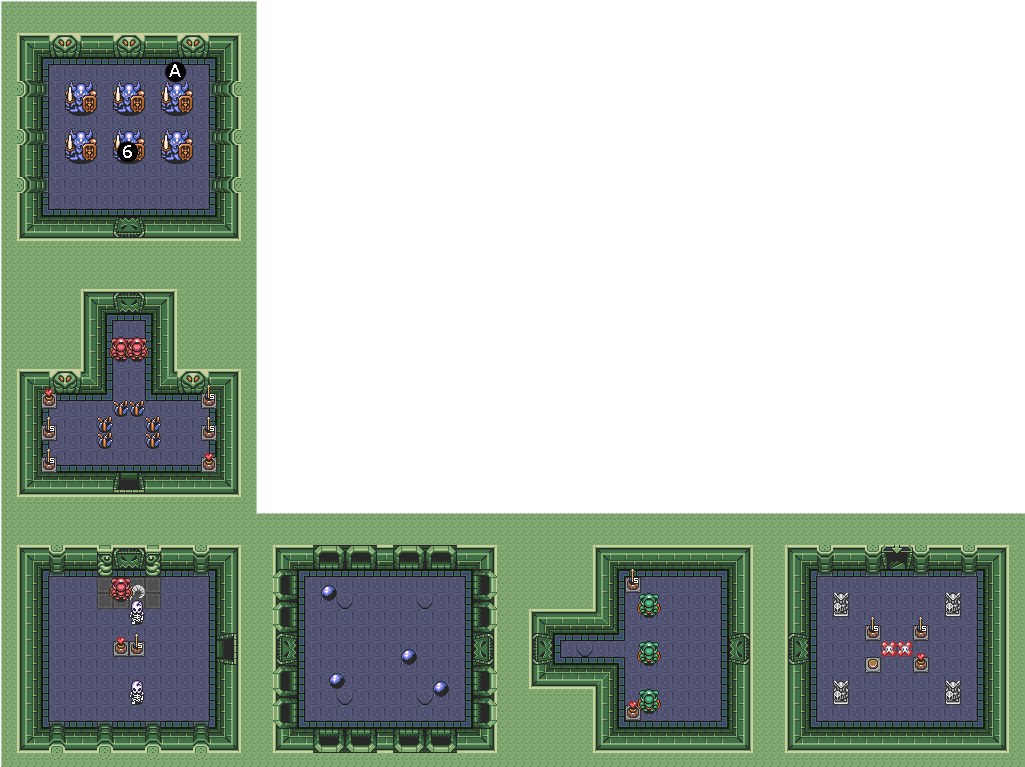
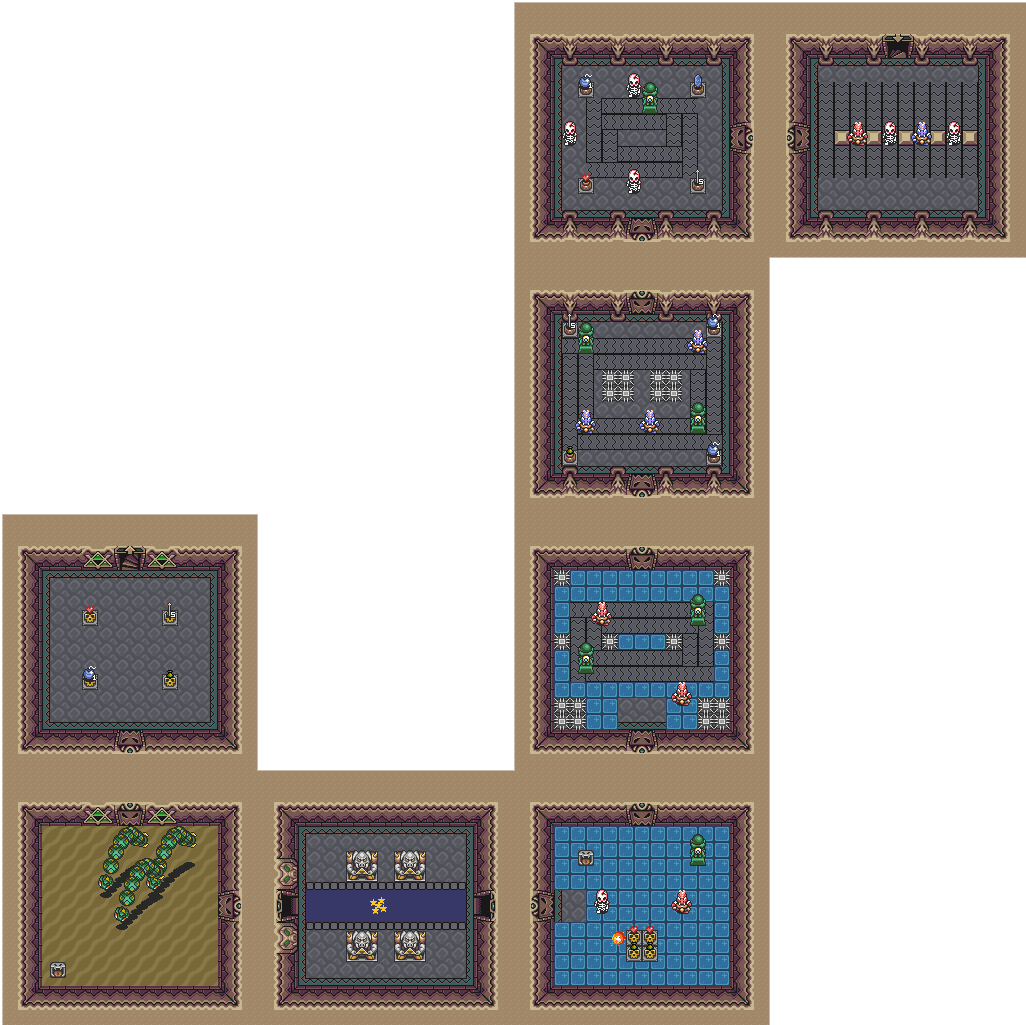
 In V30, the telepathy tiles that were used to communicate with Sahashrala now could possibly contain a hint to an item location. Some hints are good, some are not as much. Here's a list of the tiles in the game that will contain potential hints. Once again I've edited some of the ian-albert maps to show the locations of the tiles so a special thank you to them for making this possible. Overworld
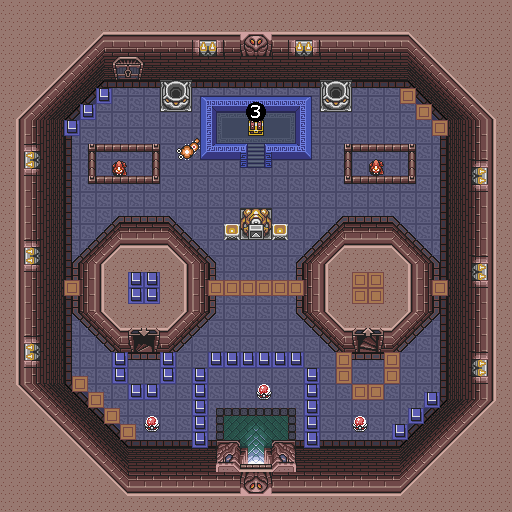
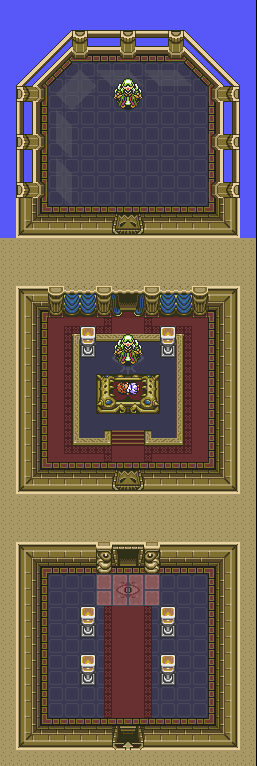
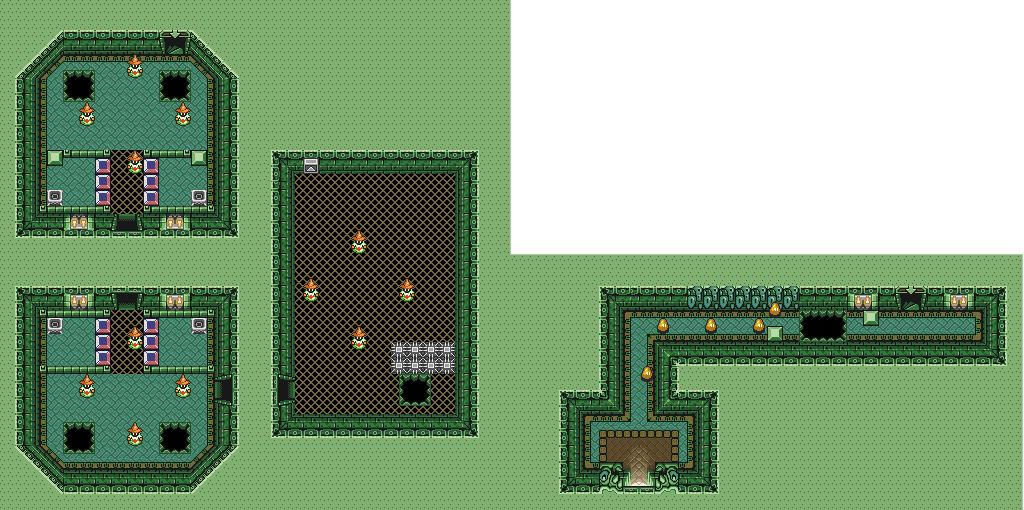
Eastern Palace
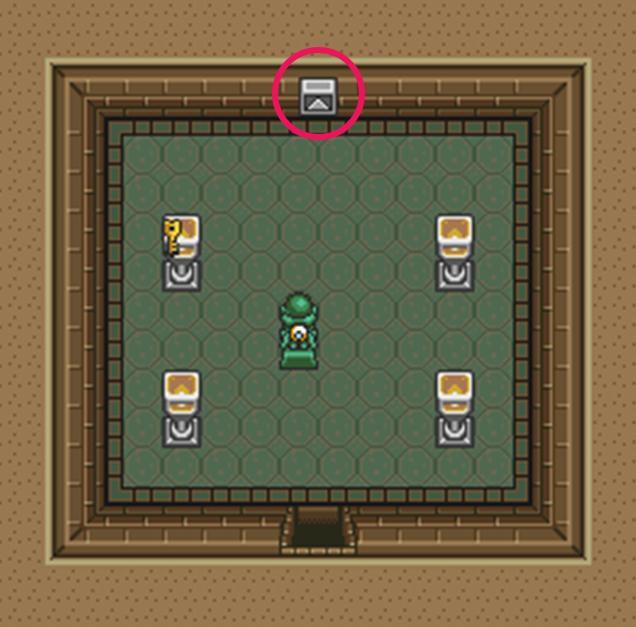
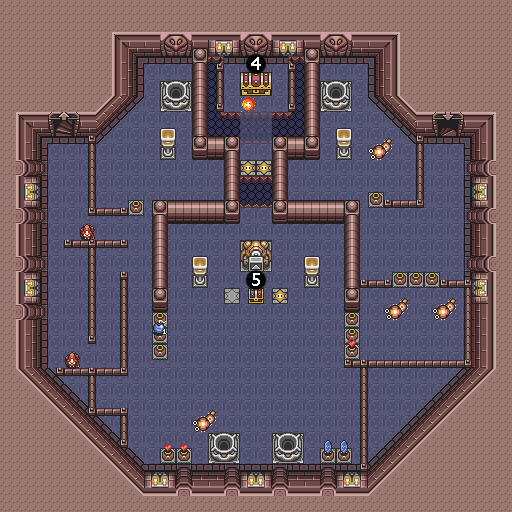
Desert Palace
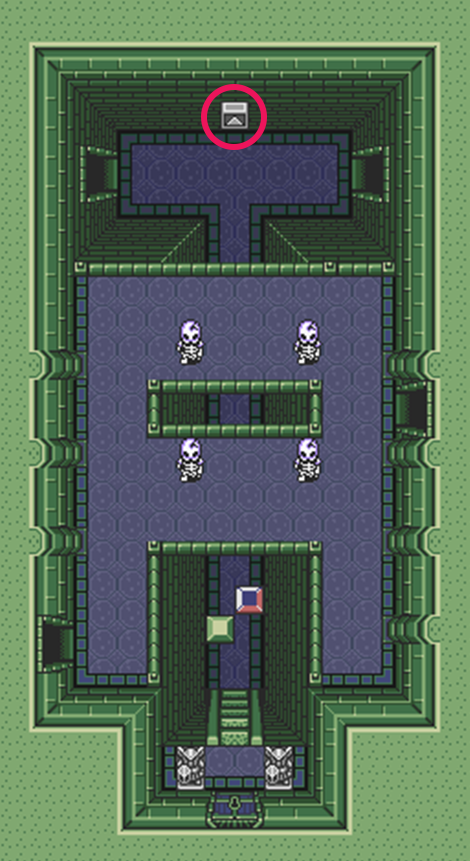
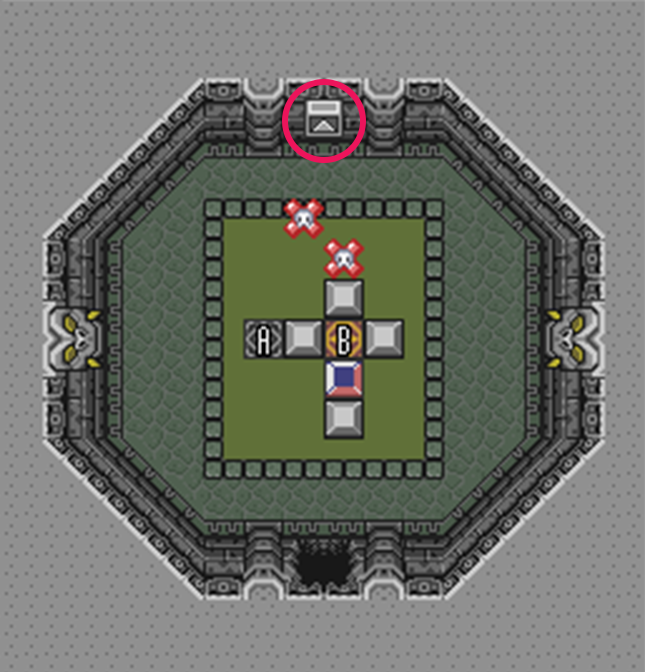
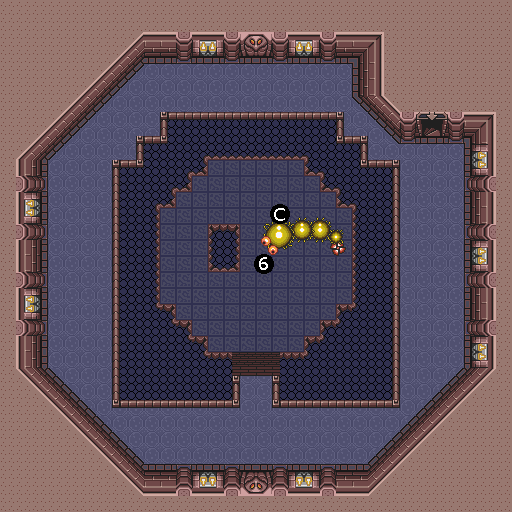
Tower of Hera
Agahnim's Tower
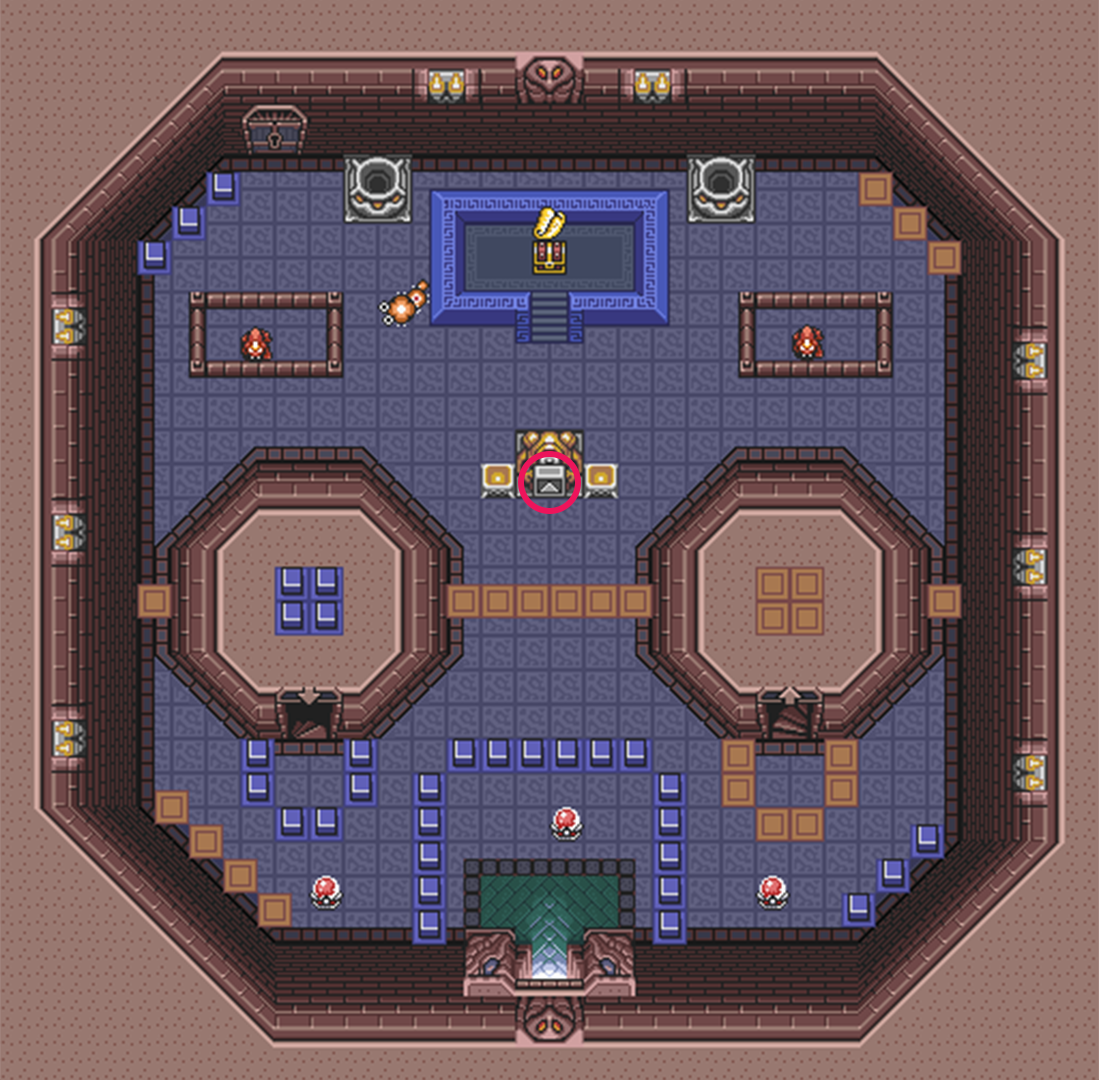
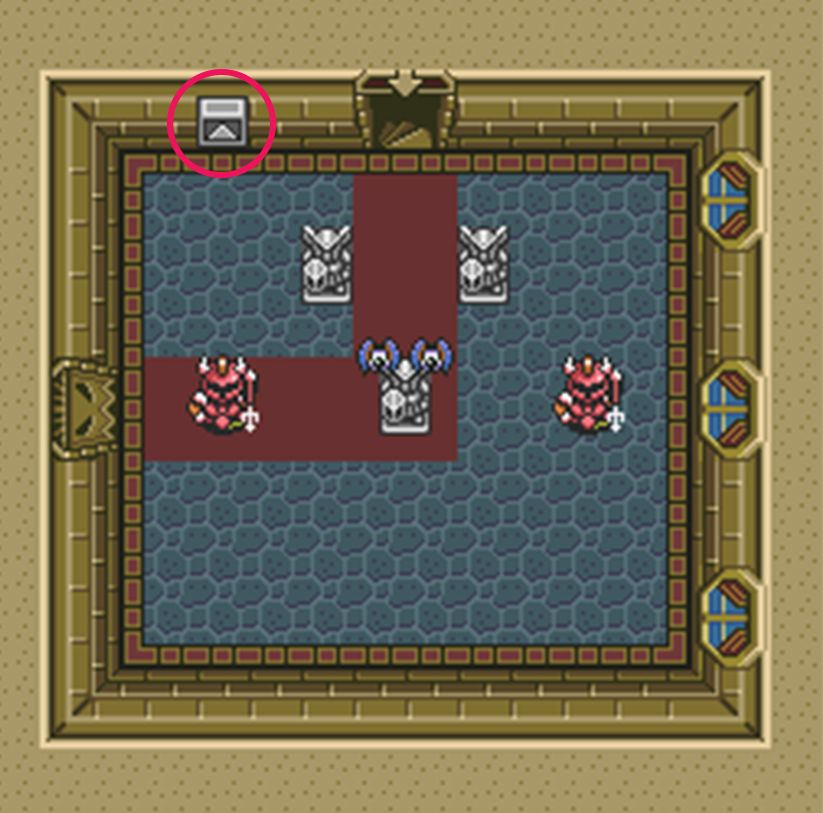
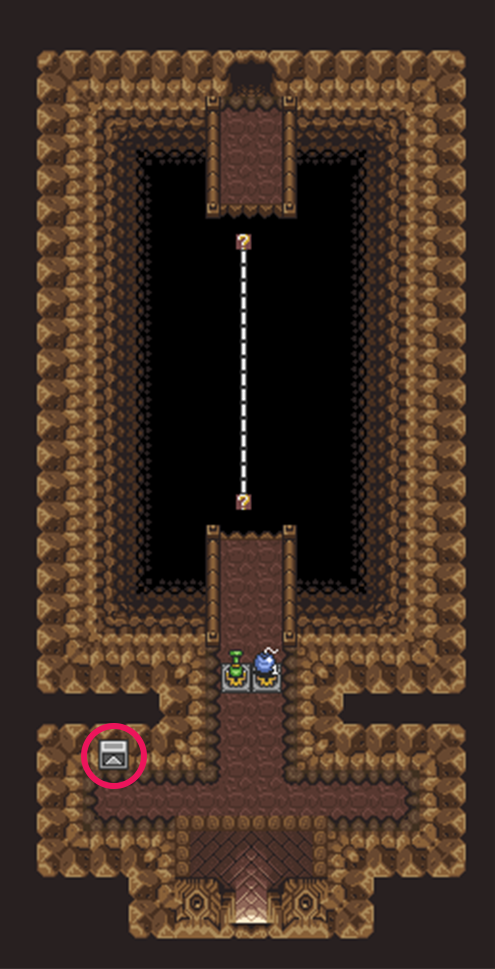
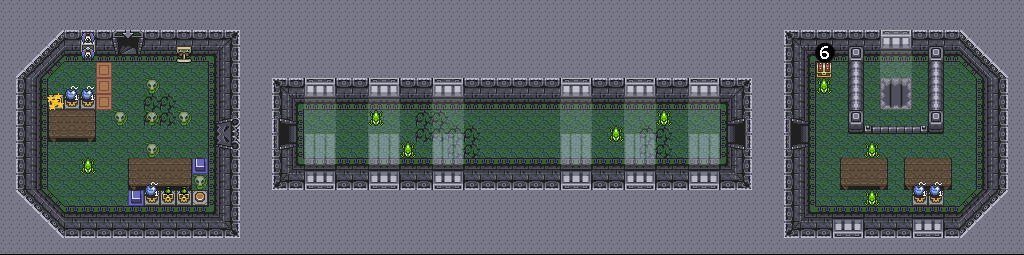
Palace of Darkness
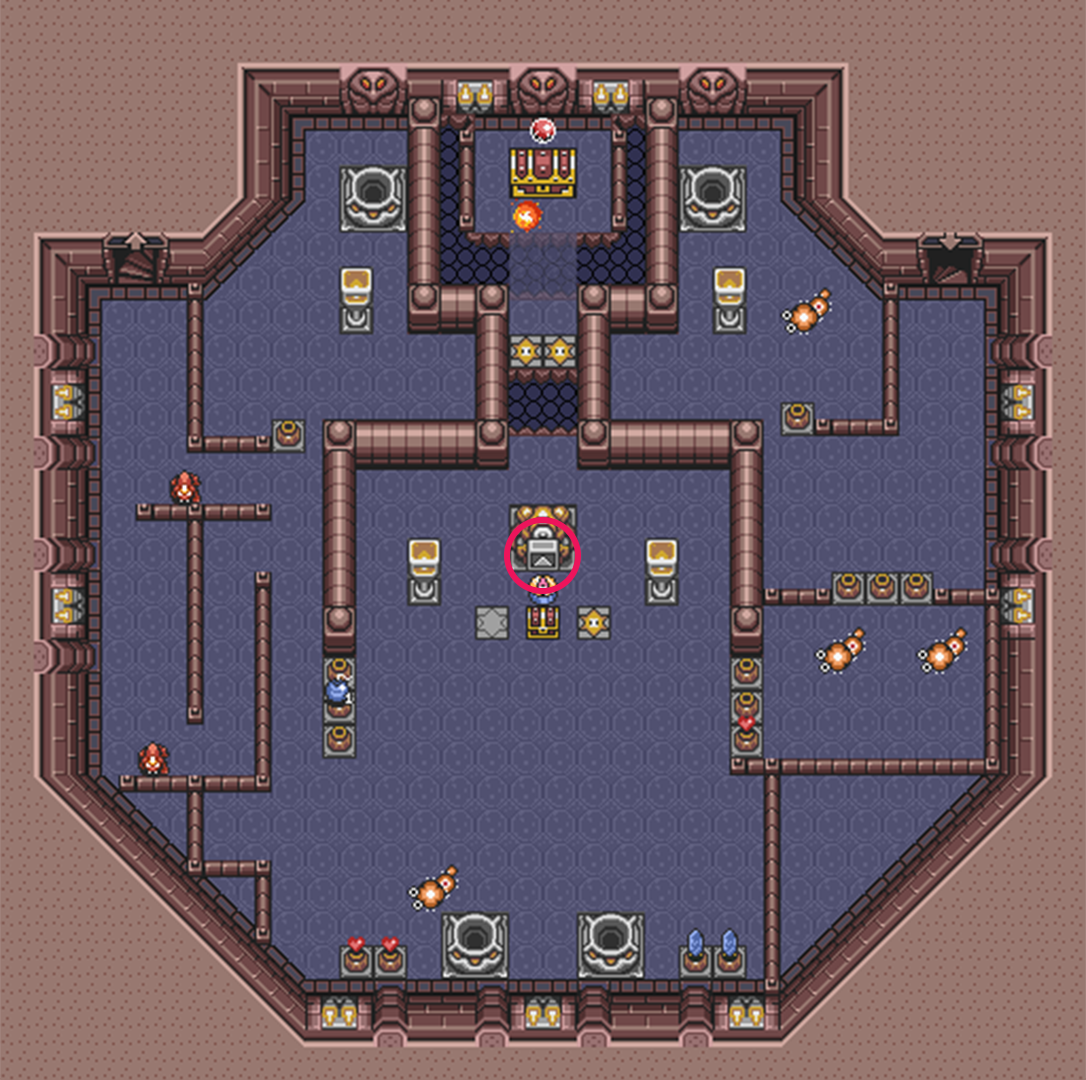
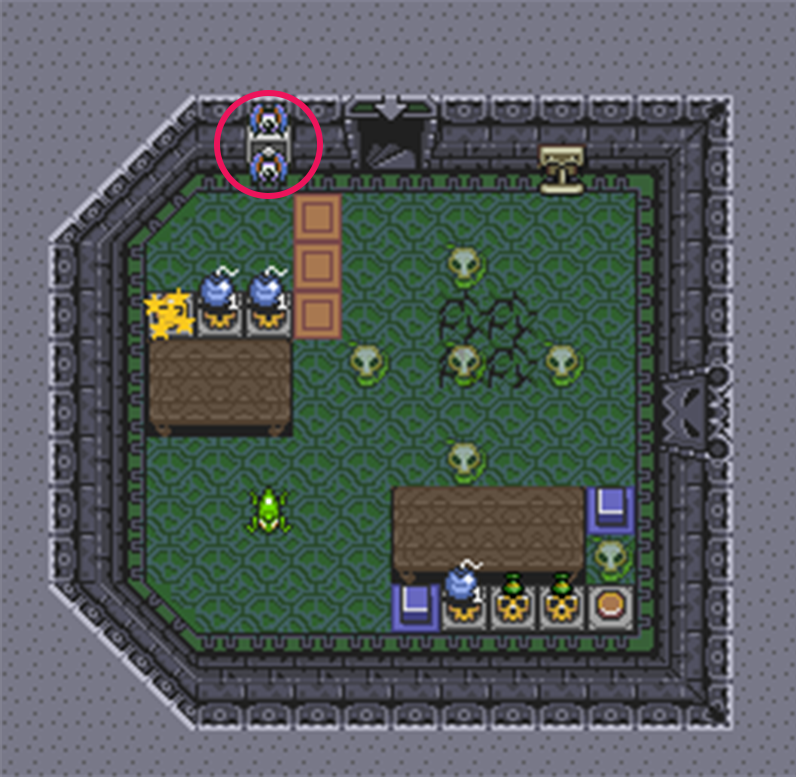
Swamp Palace
THIEVES Town
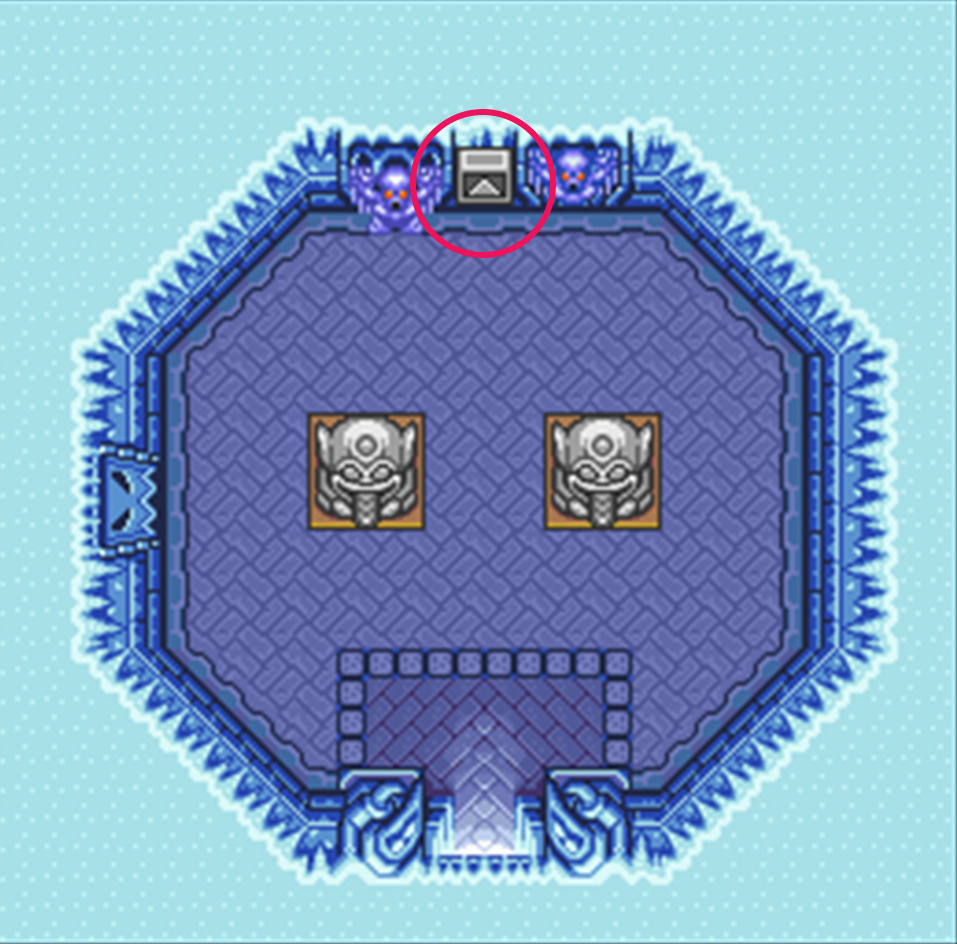
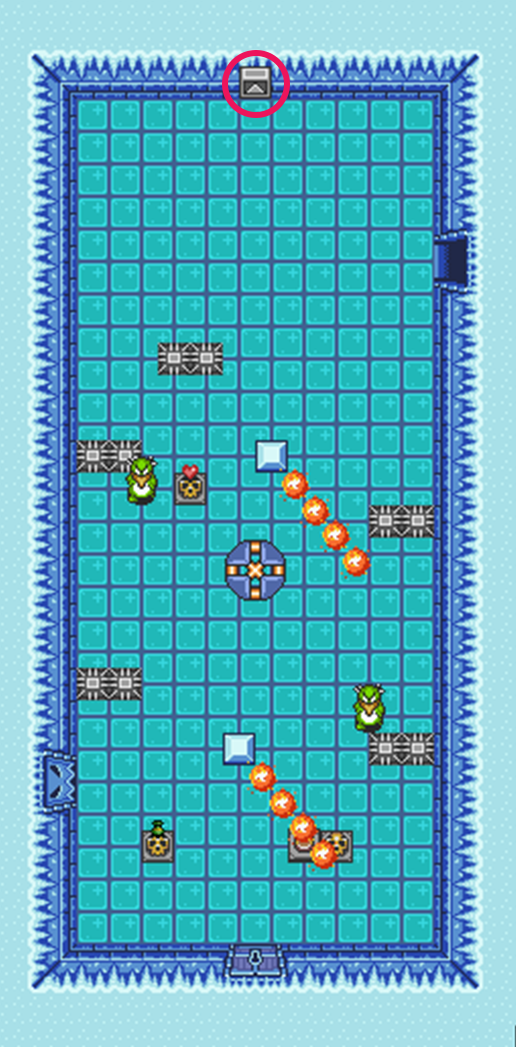
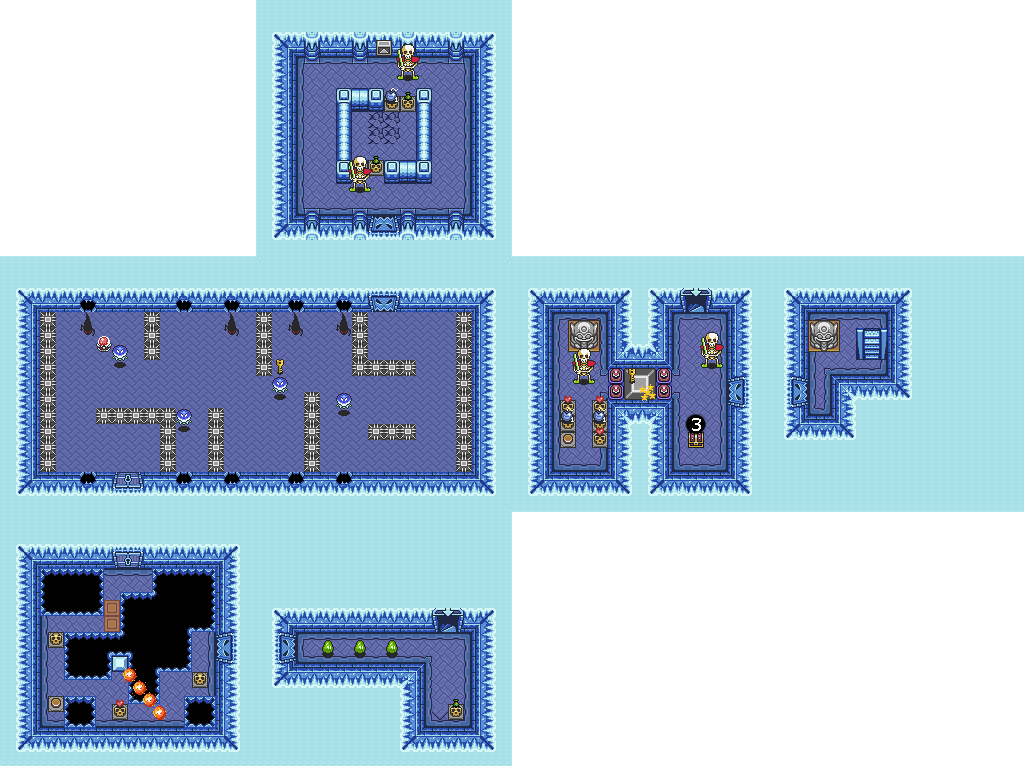
Ice Palace
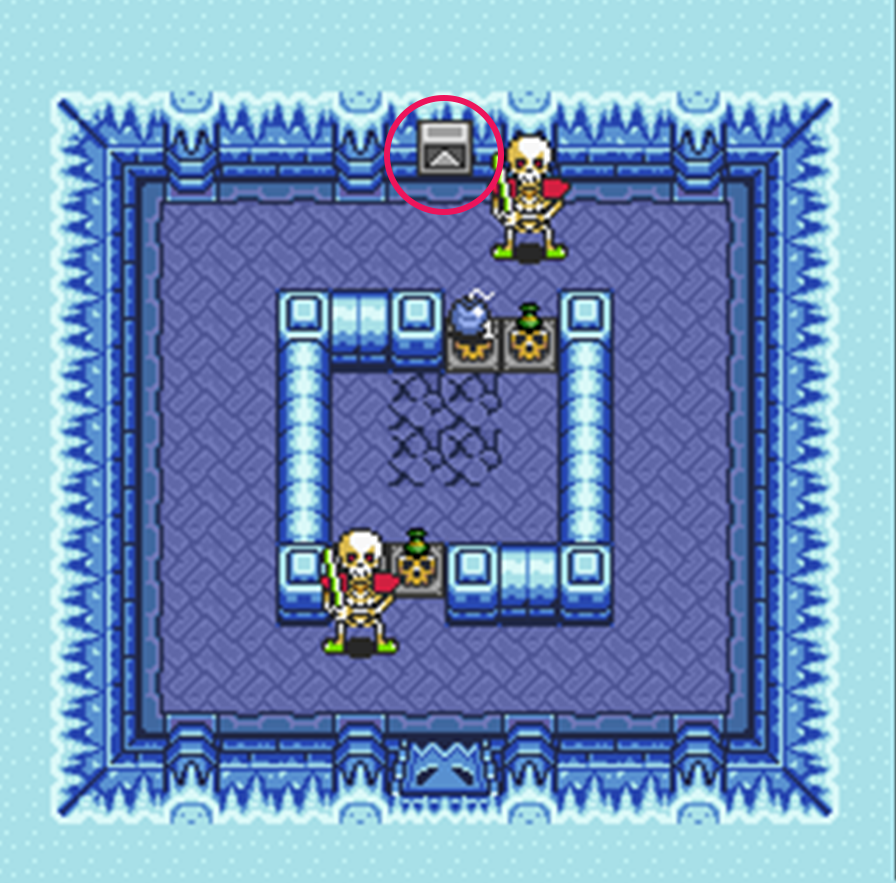
Misery Mire
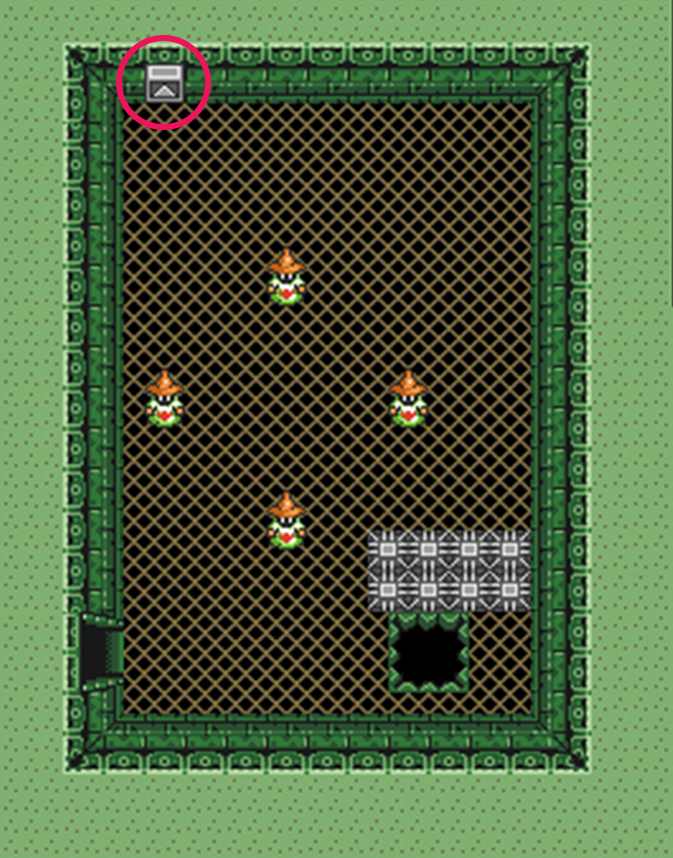
Turtle Rock
There are 2 other tile locations in the game that contain other information like past tournament winners. Let me know if you can find them!
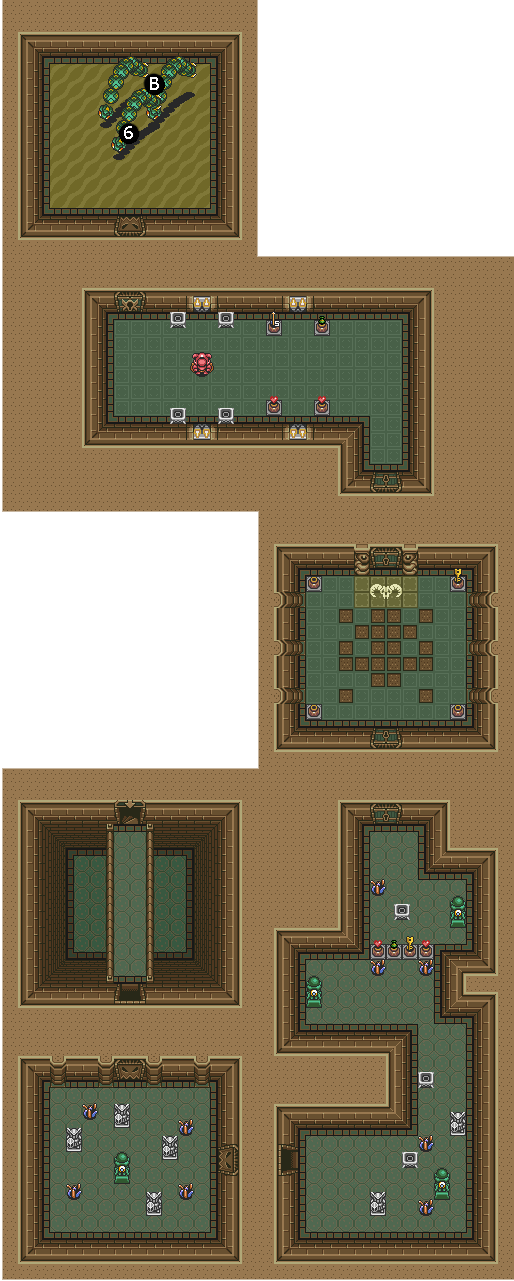
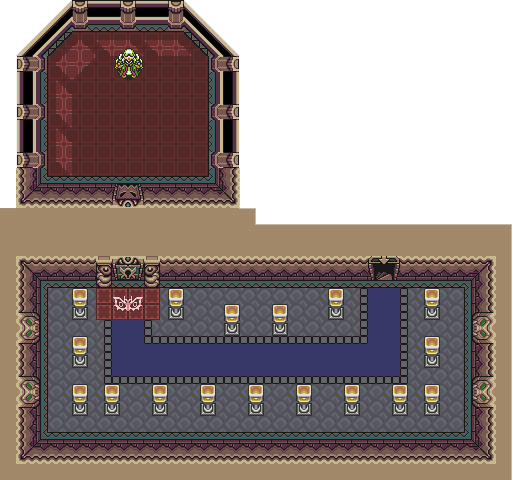
 With V30 coming out right away, one of the major changes this update is the new Inverted State. So to give you guys a head start on the newest addition to the randomizer roster, here's my newest guide! Please note that this is an advanced mode so 3 Heart Hammer Blind is a regular occurrence here. If you aren't comfortable with that, try starting off with Easy Difficulty to give yourself 6 hearts instead. Imagine a world where Ganon has won. He's taken over Hyrule and our hero's tale begins. Born in the darkworld after his family was banished there after the defeat of the original hero, he once again takes up the mantle to defeat Ganon and save Hyrule. While in the dark world, a few things have changed. Link will now require the moonpearl in order to retain his form in the light world. The flute, although is still activated in the light world, only works in the dark world. You are only able to use the mirror in the light world to transport you back to the dark world (and of course still use the mirror in dungeons). Damage values for enemies have not been adjusted so if you walk into a Hinox when you first start the game, your character will die. The frog will no longer persist following you through save and quit in inverted mode to ensure there are no softlocks. To help guide you through the journey, I've created a handy map of all the changes to Hyrule for you to use. There's also more helpful tips below the maps! 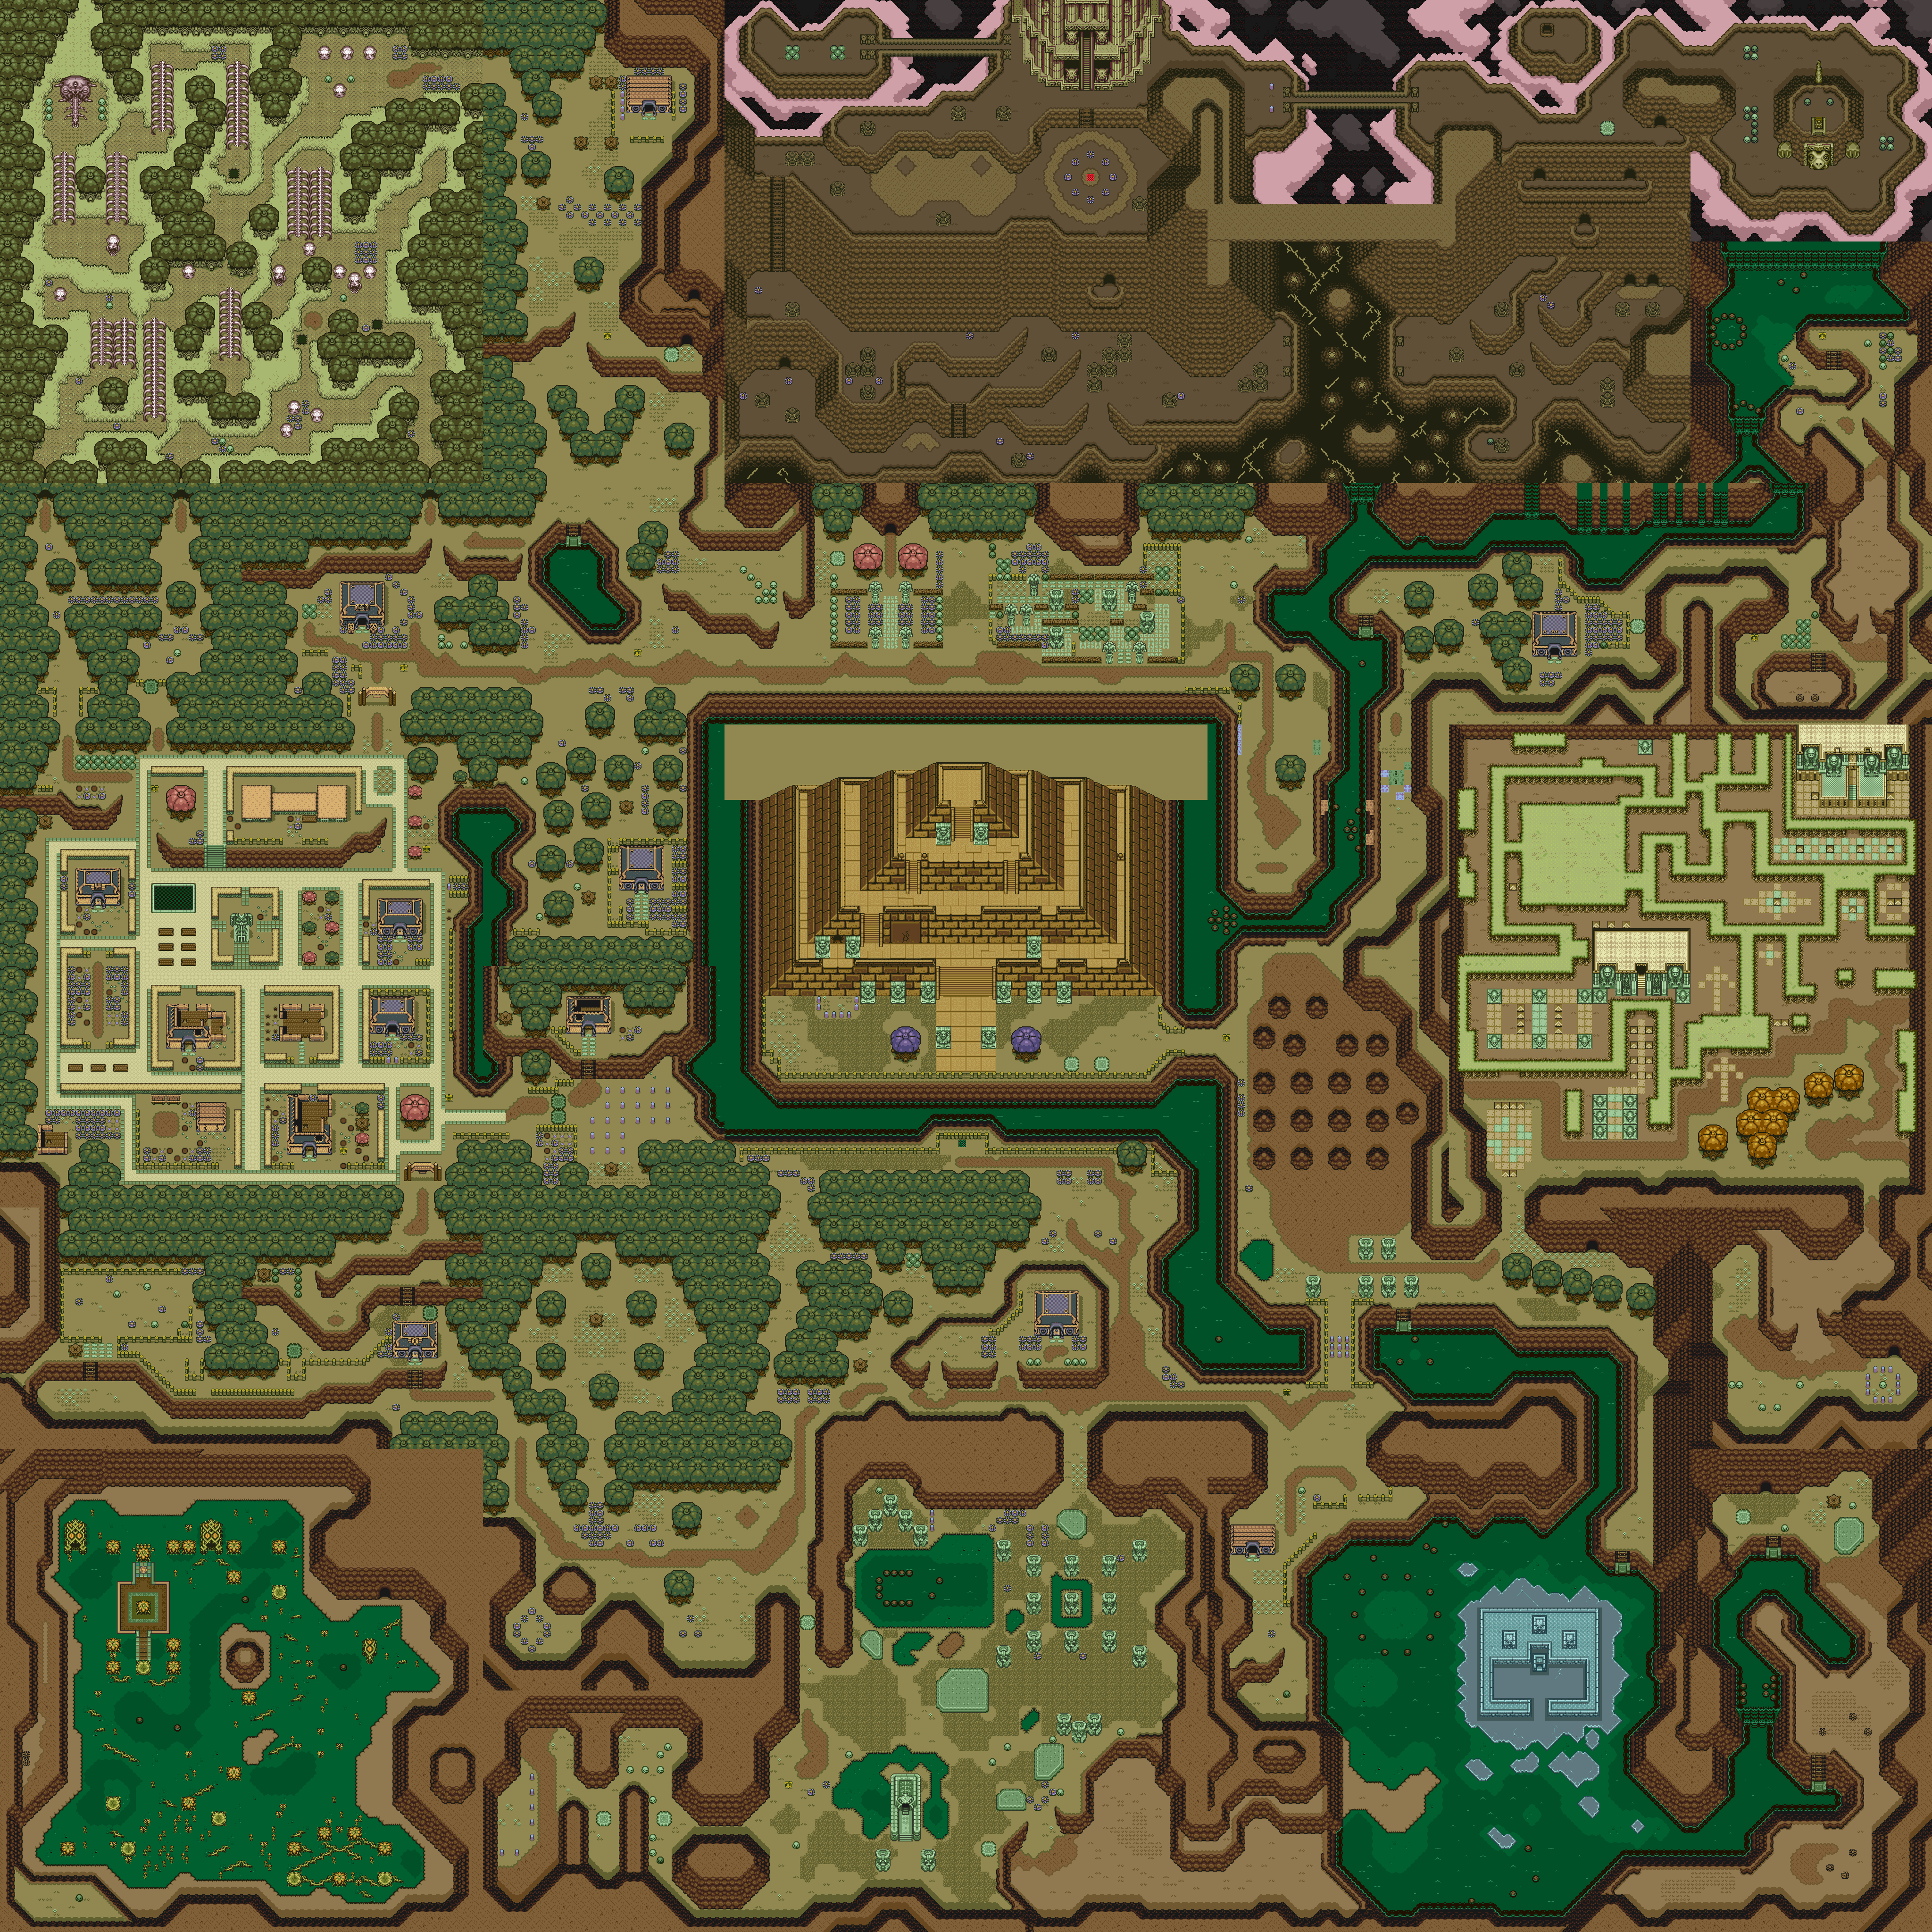  The following changes have been added to the Inverted State in order to make all item locations accessible:
The warp tiles that you would originally find in the vanilla locations have been moved to their dark world counter spots. There is two notable exceptions to this however. Agahnim has now taken up residence on Death Mountain in Ganon's Tower which is permanently open in Inverted. Once you have defeated Agahnim a warp tile will spawn in the dark world above Link's house. The warp tile on Turtle Rock is now in the Dark World and requires you to climb on his tail to reach it. In the Light World, stairs have been added to access the Bombos Tablet, the Graveyard Ledge, and the Lake Hylia Island. Cave 45, Checkerboard Cave and Spectacle Rock have been flattened to be able to access without mirror. There is now a bridge to access the Floating Island and there is now a cut out in the wall to jump down to Mimic Cave. The Cave that used to lead up to Death Mountain now leads to bumper cave and exits onto the light world bumper cave ledge allowing you to mirror over to get the item. In the Dark World, Ice Palace has had the wall blown open so you can access the dungeon without needing to mirror into it. The GT stairs have been permanently lowered so you can access Aga Tower when you go up death mountain. A new set of stairs has been added on death mountain below Ganon's Tower. The bumper cave entrance actually takes you to the Old Man Cave and Exits onto Dark Death Mountain. Turtle Rock has 4 entrances now with 3 of them being accessible with the mirror. It is no longer guaranteed that you need the medallion to access Turtle Rock. Simply jump down to a couple of the ledges on death mountain and mirror over to the dark world and walk into Turtle Rock! If playing in Inverted with the Defeat Ganon objective, once you have obtained all 7 crystals you will head to Hyrule Castle where you will head towards Aganihm's Tower. Once you get to the door, you will get the crystal opening sequence cut scene and the Tower will now open for you. Once inside you will find you are in Ganon's Tower and will have to begin the climb to Aga 2. After Aga 2 has been defeated, Ganon will fly out of the tower and crash through the floor of the castle right in front of the door. Defeat Ganon as usual to complete the game, however, if you have the unfortunate luck to fall during the Ganon fight, you will find yourself at a new entrance on the left side of the courtyard that looks exactly the same as the secret entrance you speak to your uncle in. Head back in and take Ganon down to obtain the Triforce and Save Hyrule! 
A few months ago I decided to do an in depth guide on A Link to the Past Randomizer dungeons and chest locations. It includes every available way to access every location. It also includes every way to route every dungeon in the game. A helpful viewer had made some time stamps for every dungeon.
I included a few minor glitches like the POD potion glitch, spin speed and item dash. The video is a bit long but it literally covered everything in the game.
I thank you very much for taking the time to look over this guide. Please leave any questions or comments below if you think I have missed anything or if you have a suggestion for another guide.  On Saturday we saw one of the biggest weekly races for the randomizer capping out at 86 participants! As I was waiting for the race to begin I sat there recalling how stressful setting up the IRC was for my first race and decided it was time for an updated guide specifically for the Randomizer community. This guide will go into everything from rules to how to setup your SRL IRC account and what commands you need to be able to participate in these races. Rules for Racing LttP Randomizer on SRL
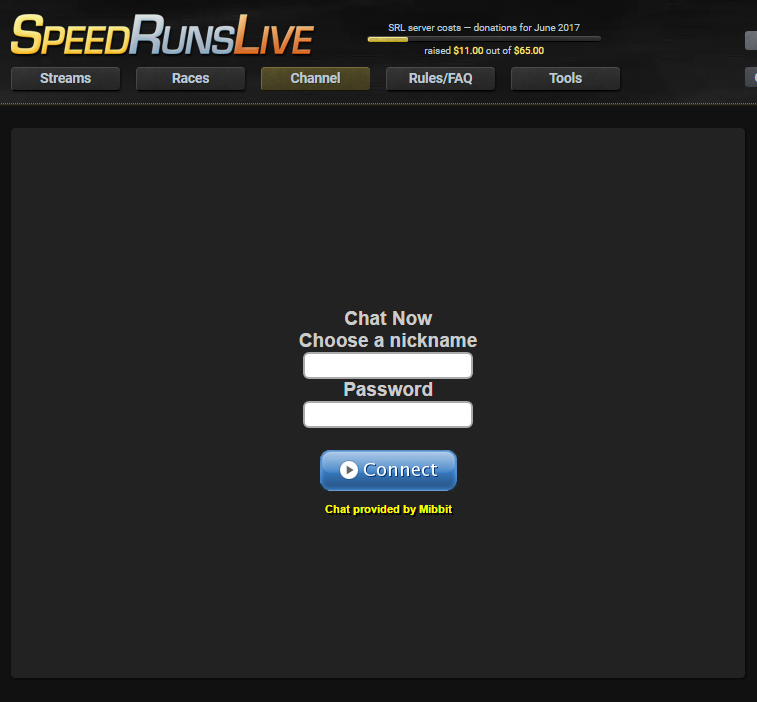
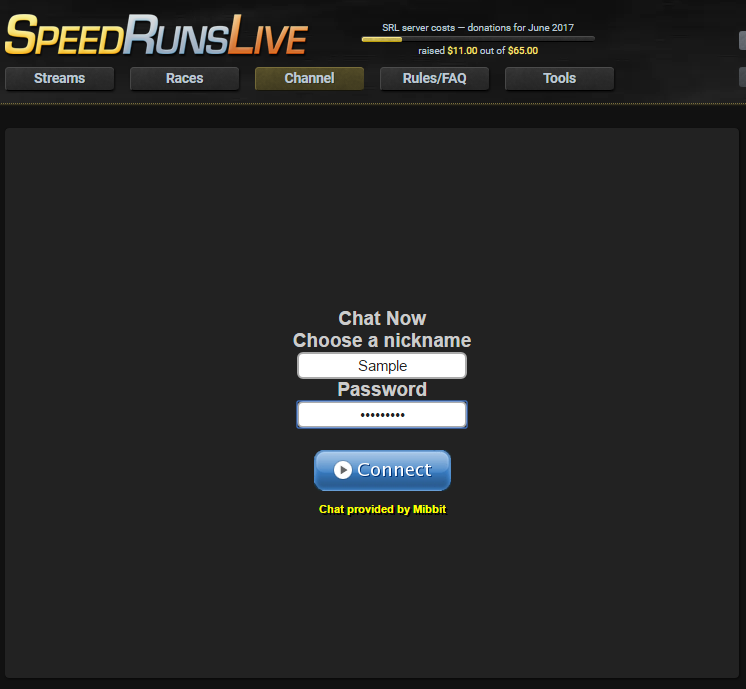
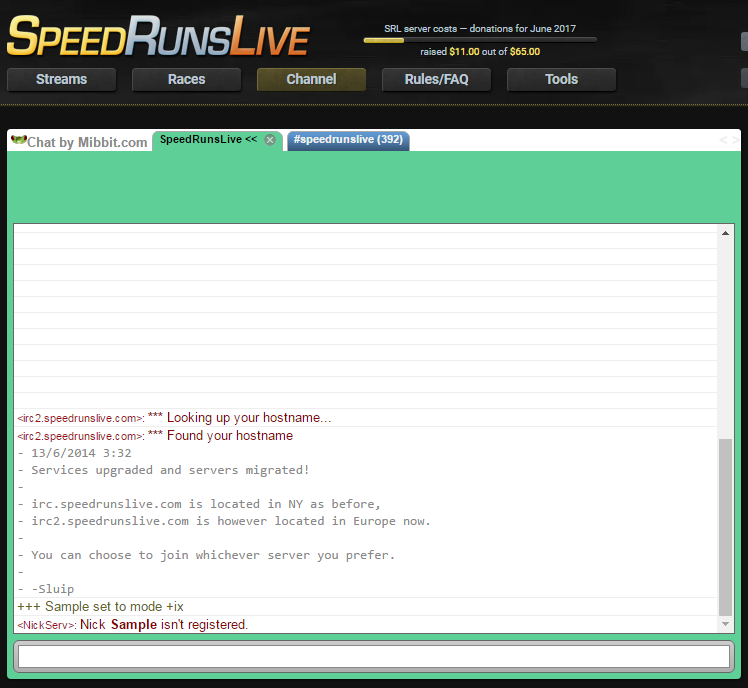
A full list of rules and consequences for the SRL IRC can be found here. How to Create aN Account at speedrunslive.comIn order to join a race, you must create an account on the IRC at speedrunslive.com/channel/
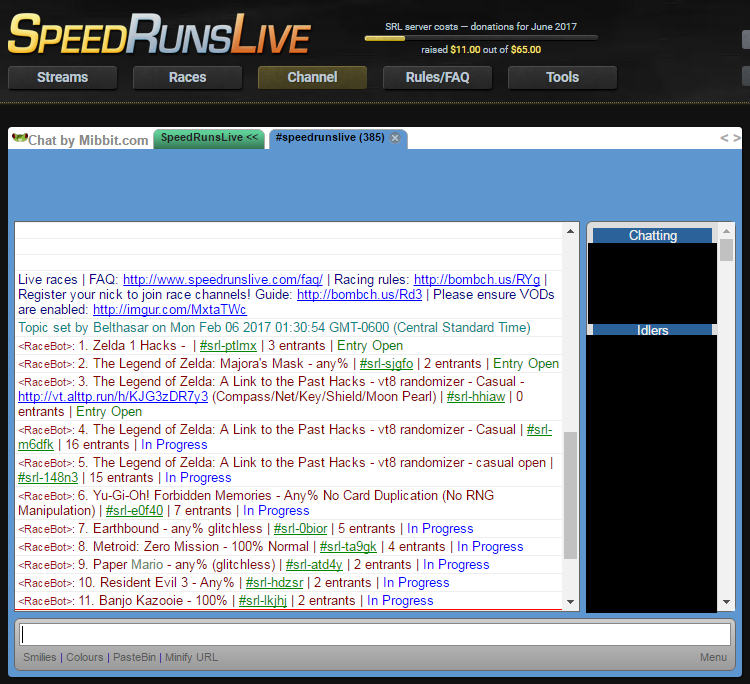
Commands for the SRL IRC Channel.races - pulls up a list of races currently available .startrace alttphacks - creates a new race channel for a Link to the Past Hacks (which includes randomizer and other romhacks) .setstream twitch.tv/username - set your twitch channel
Commands for the Race IRC Channel.casual - set's the goal of the race to VT8 Randomizer - Casual and automatically generates the seed .enter - join the race .unenter - removes you from the race if the race has not yet started .ready - notifies the bot and the other runners that you are ready to start .unready - notifies the bot and other runners you are no longer ready to start .done - you have finished the race .undone - use this if you accidently .done early or if you .forfeit but want to continue .forfeit - forfeit from the race .entrants - shows you how many people have joined the race .multi - gives you a multitwitch link to all the racers if available **A full guide to all commands can be located here. LttP Weekly RanDomizer Race InformationThe Link to the Past Randomizer weekly race happens every Saturday at 3 PM EDT/EST. The seed will be handed out in the IRC channel 10 mins before the race begins. You must be streaming by 3 PM EDT/EST in order to participate in the race. Please be ready on time to be courteous to your fellow racers. I thank you very much for taking the time to look over this guide. Please leave any questions or comments below if you think I have missed anything or if you have a suggestion for another guide.
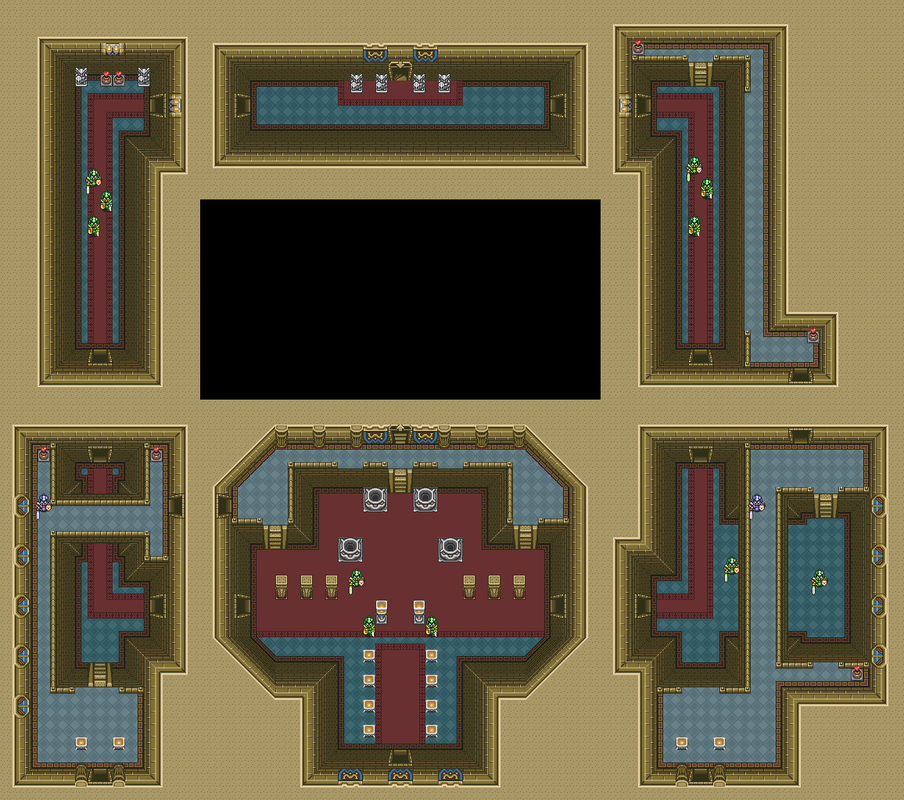
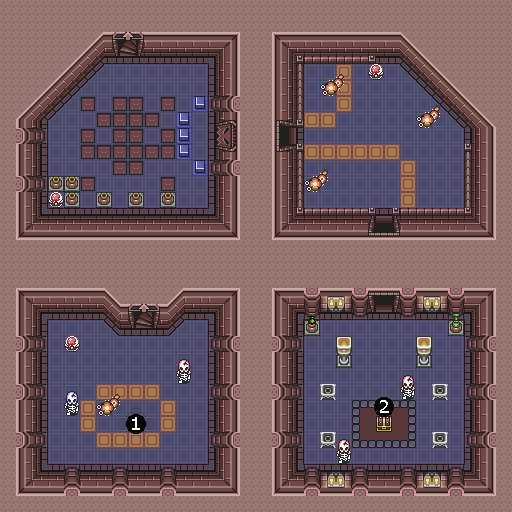
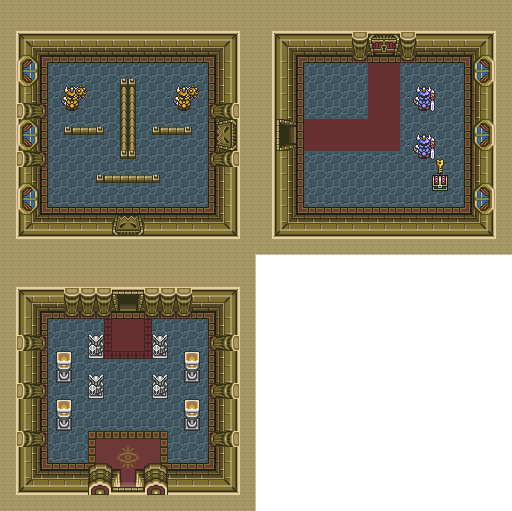
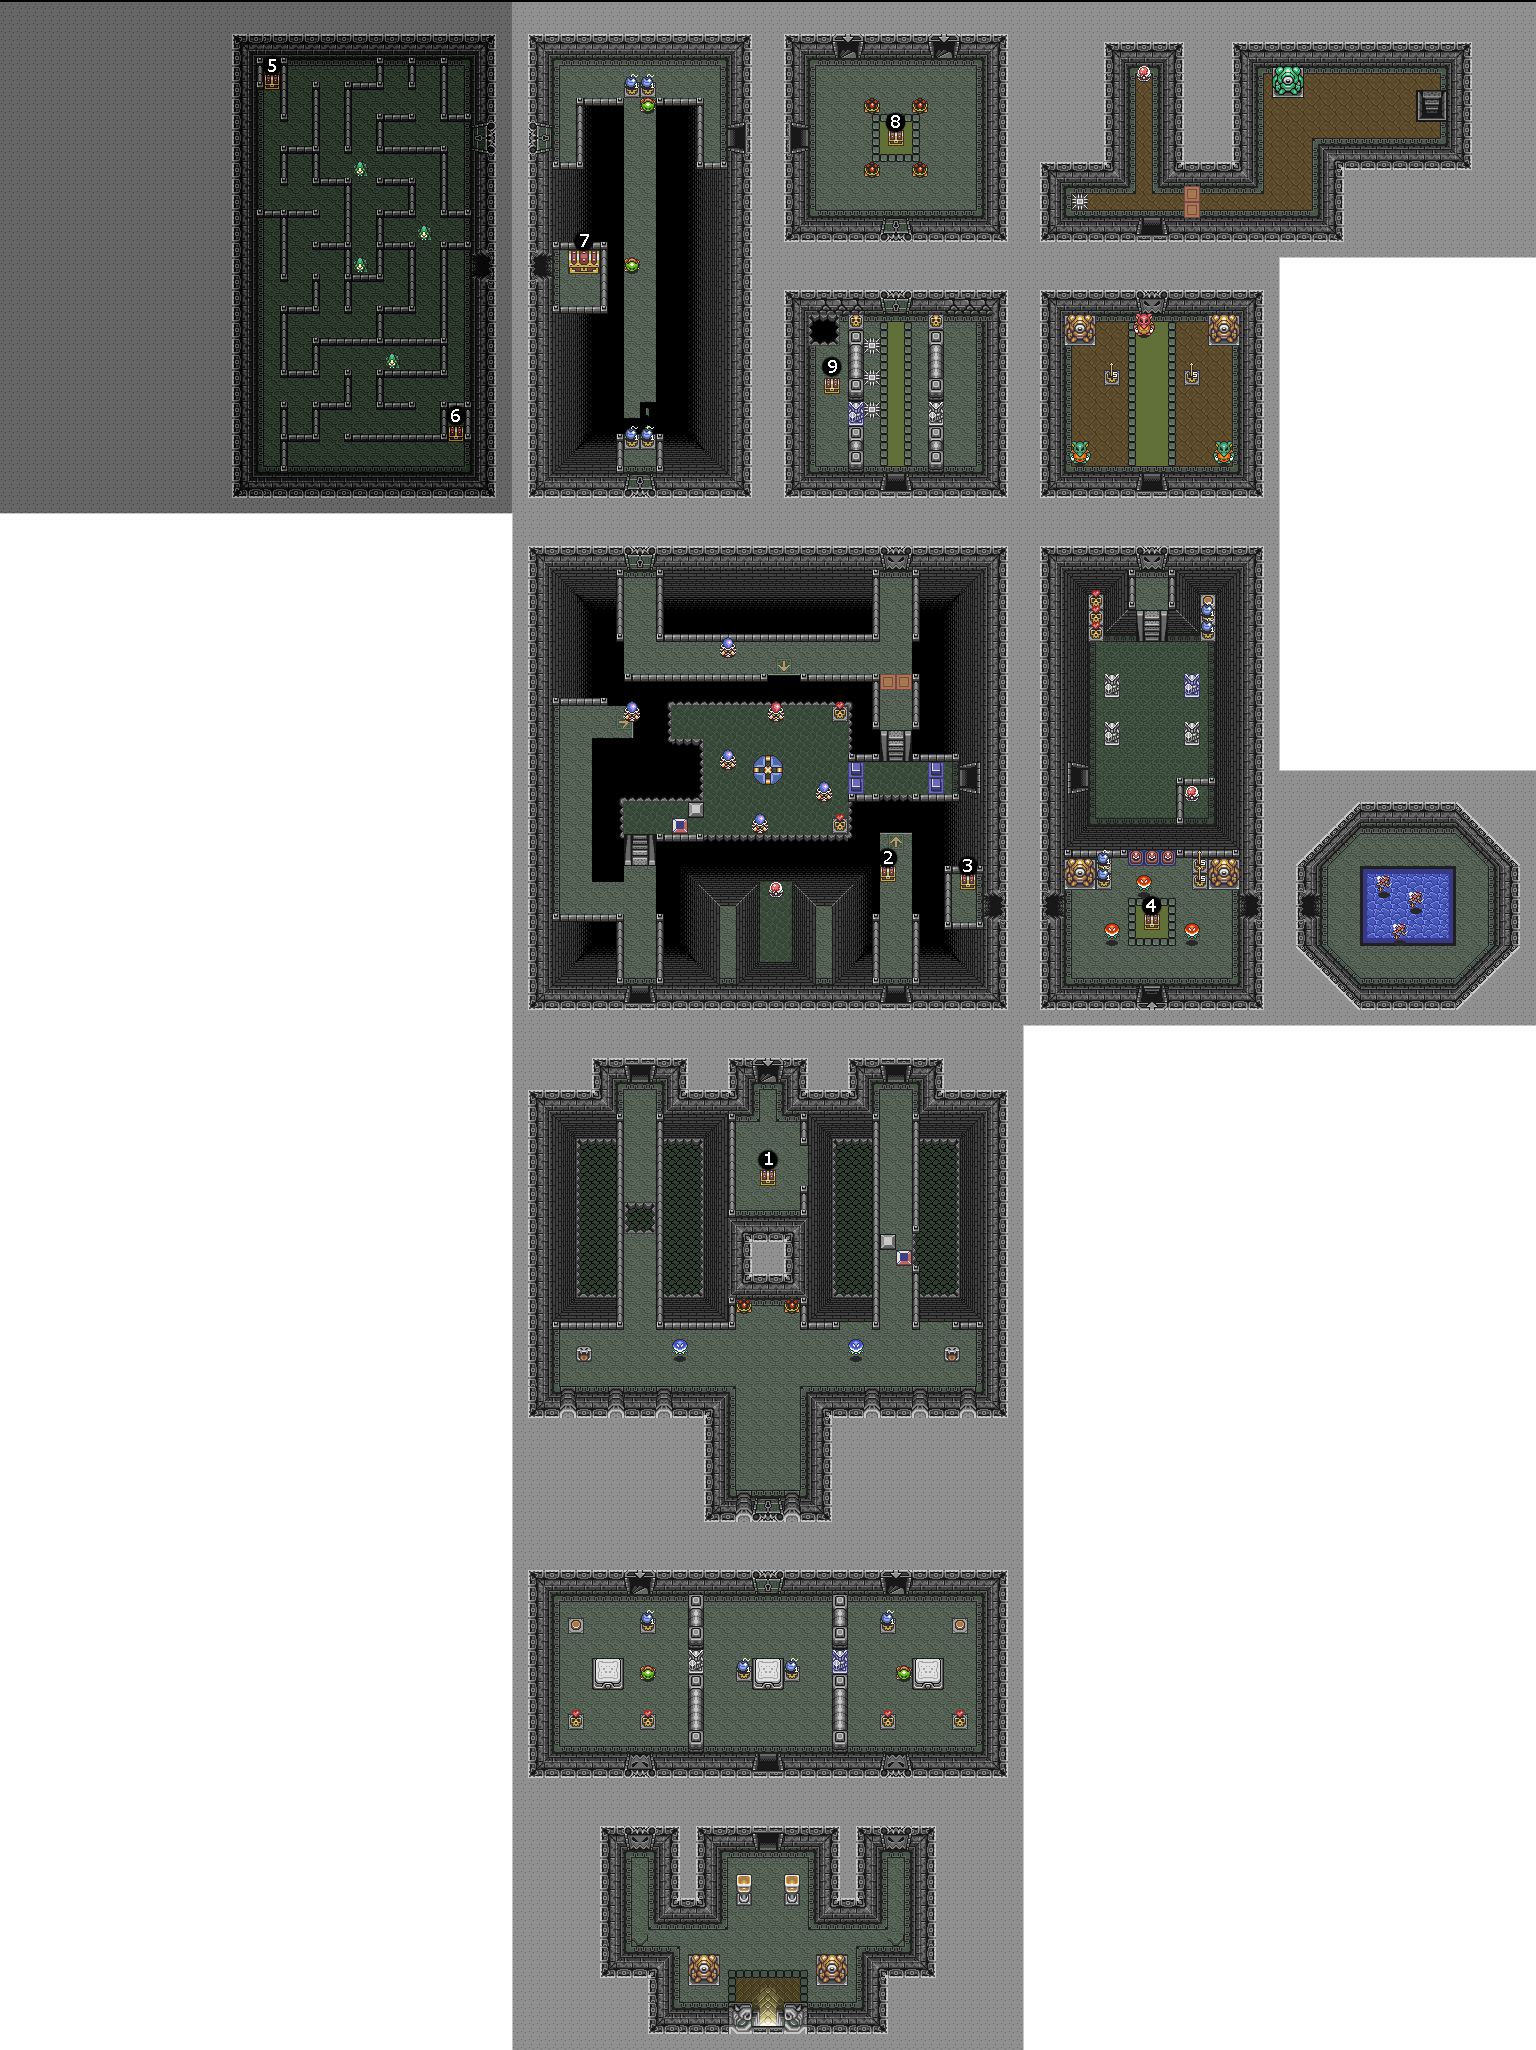
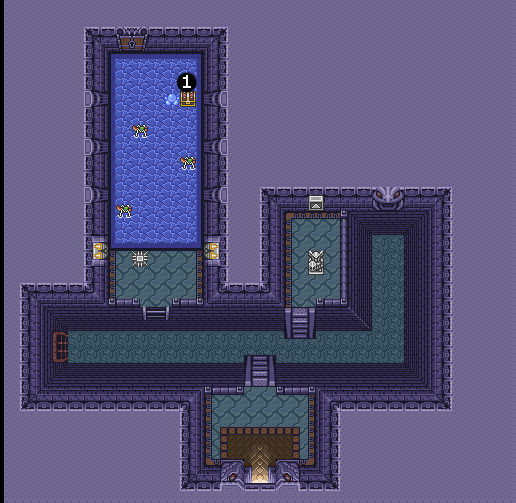
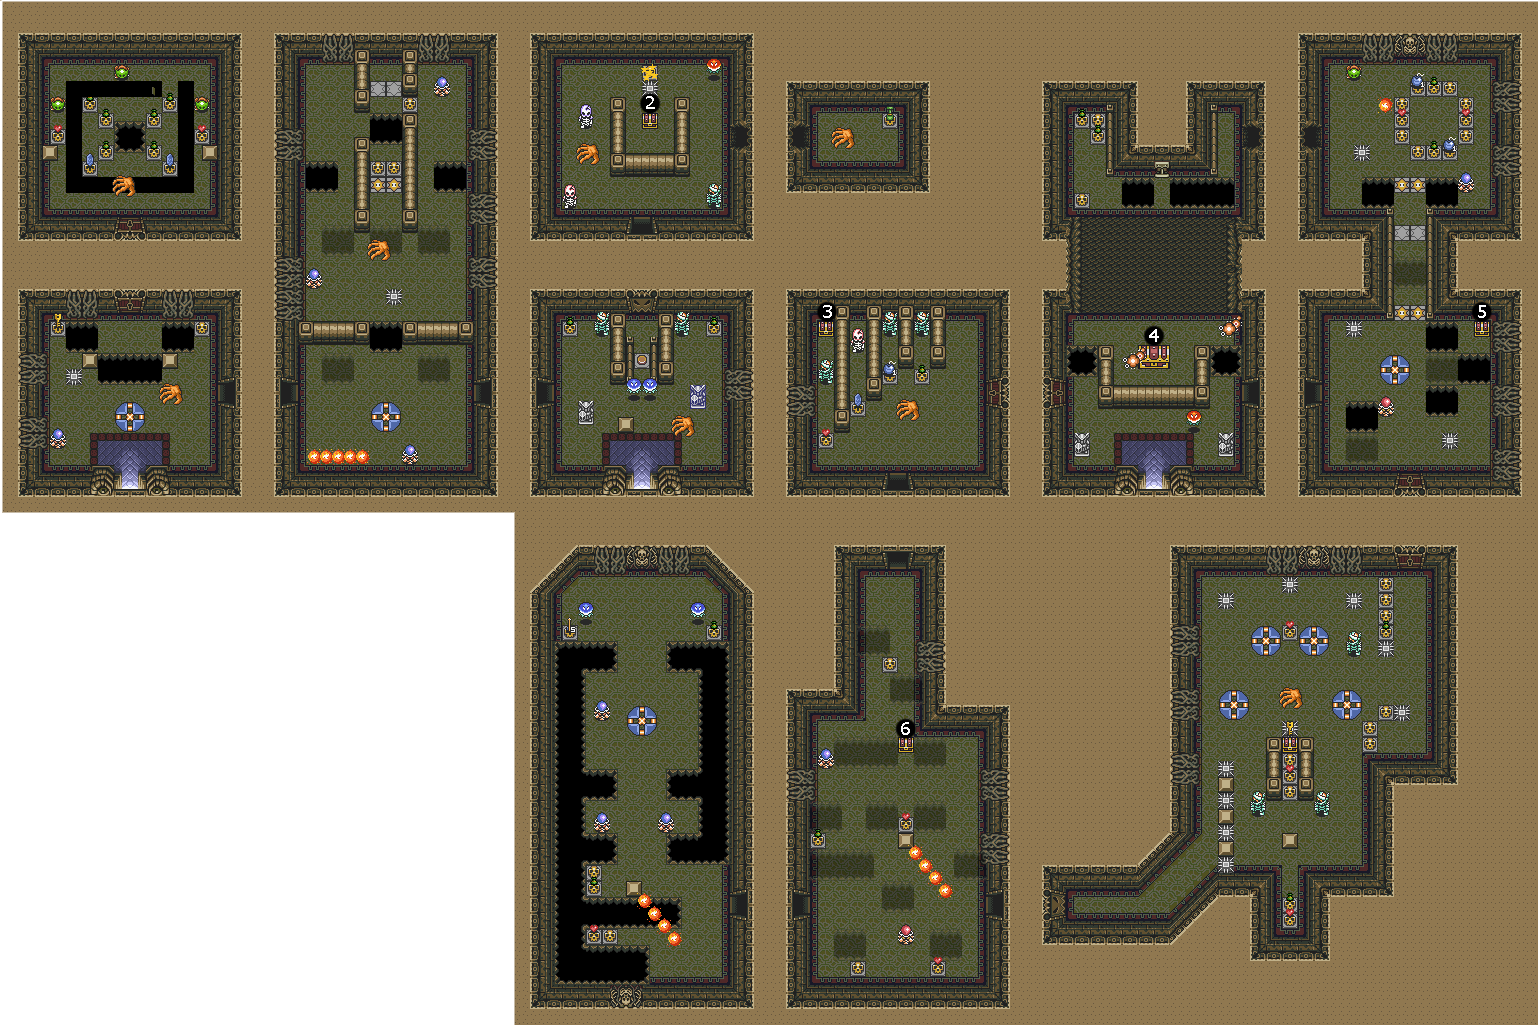
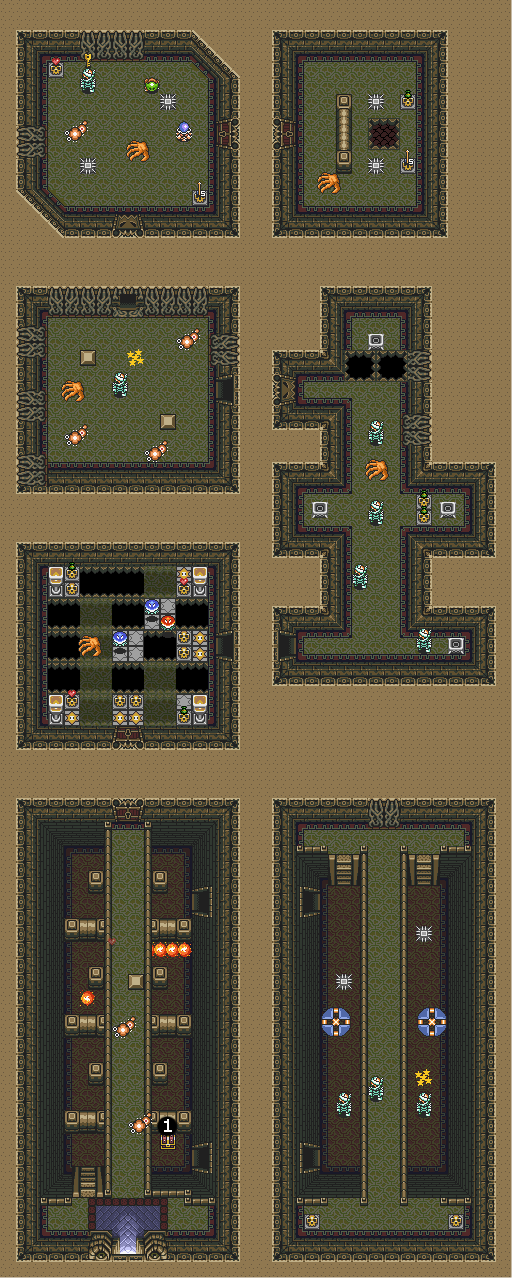
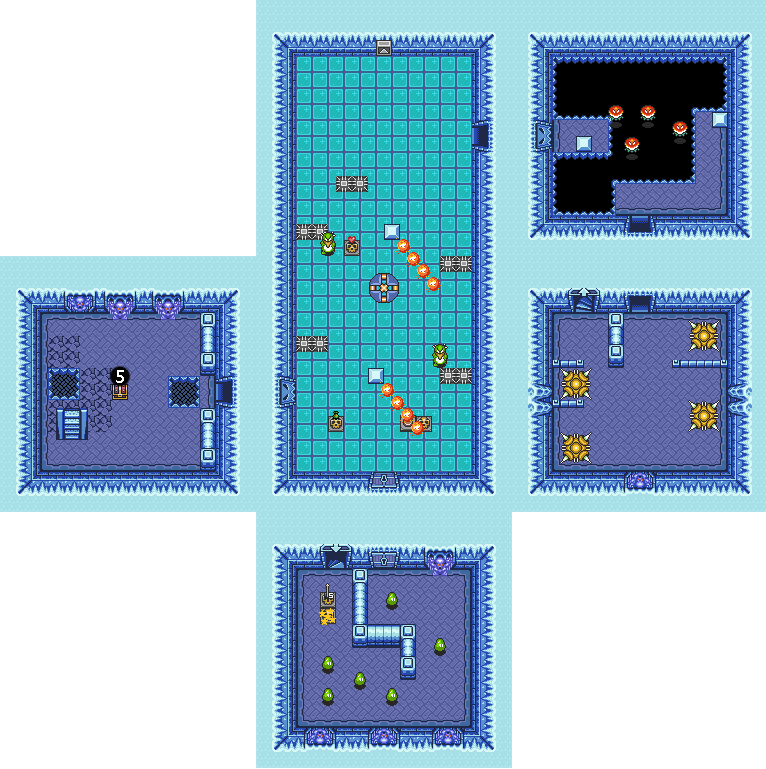
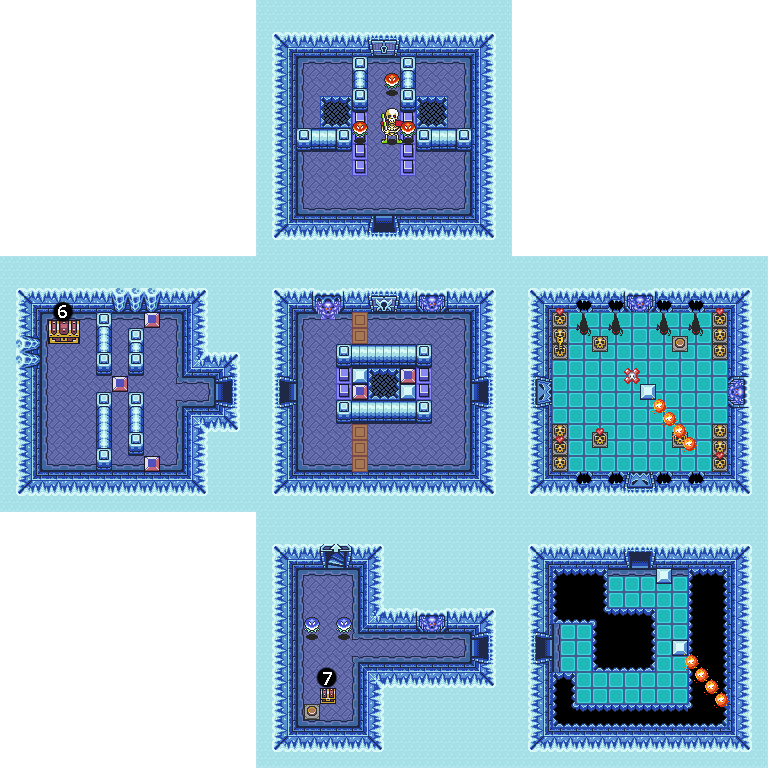
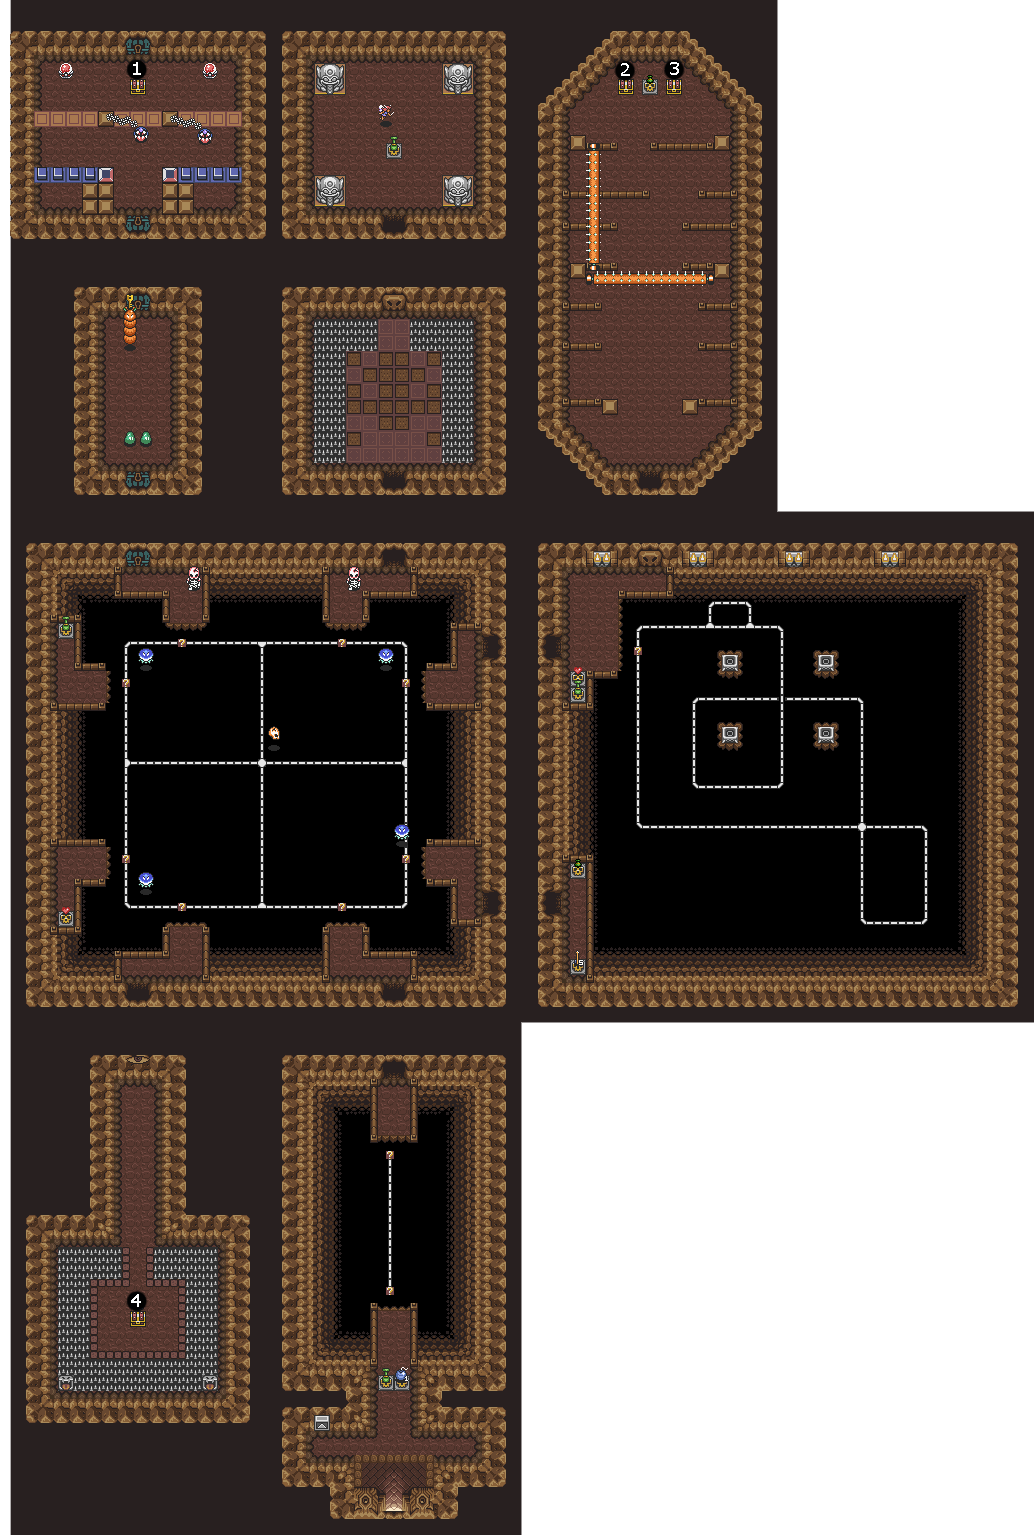
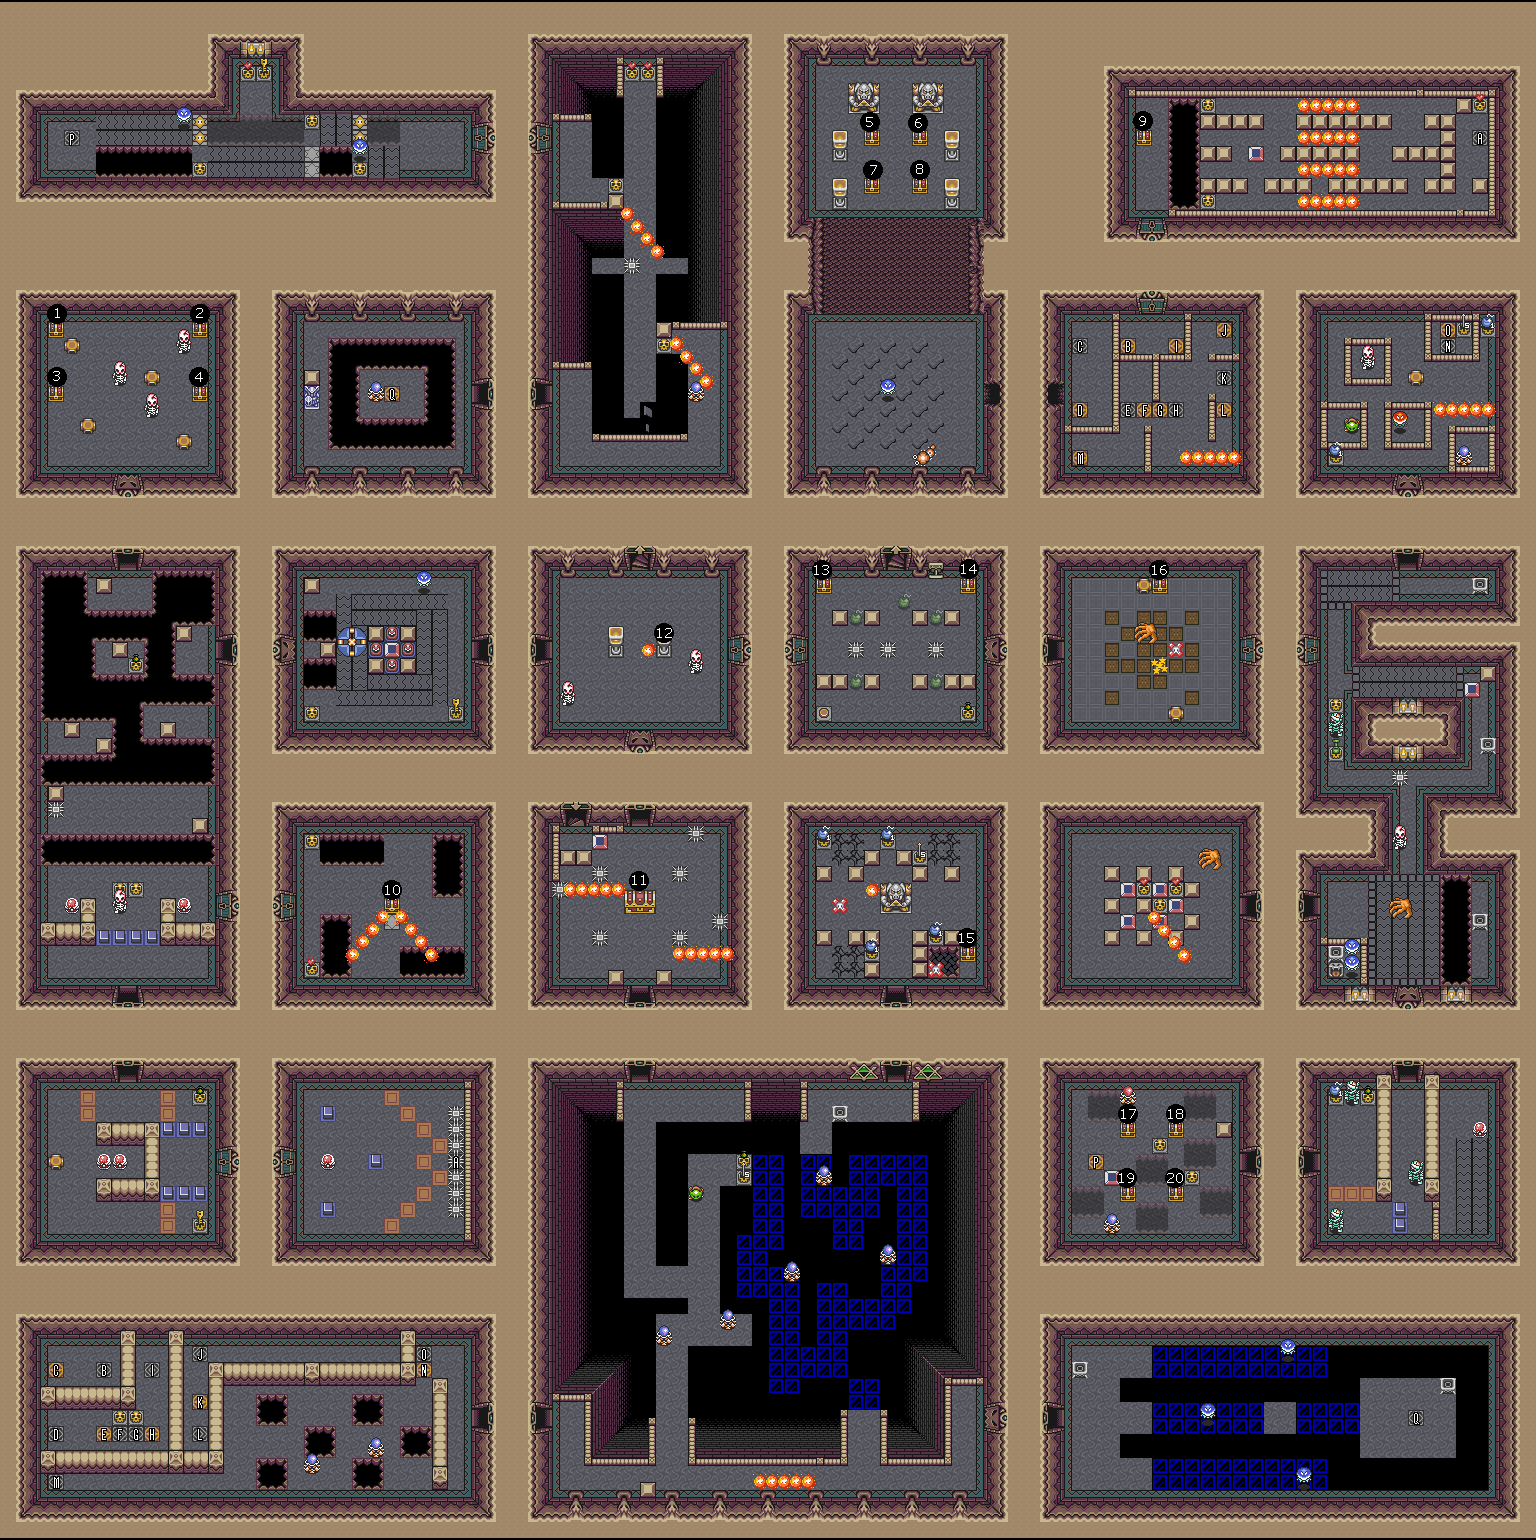
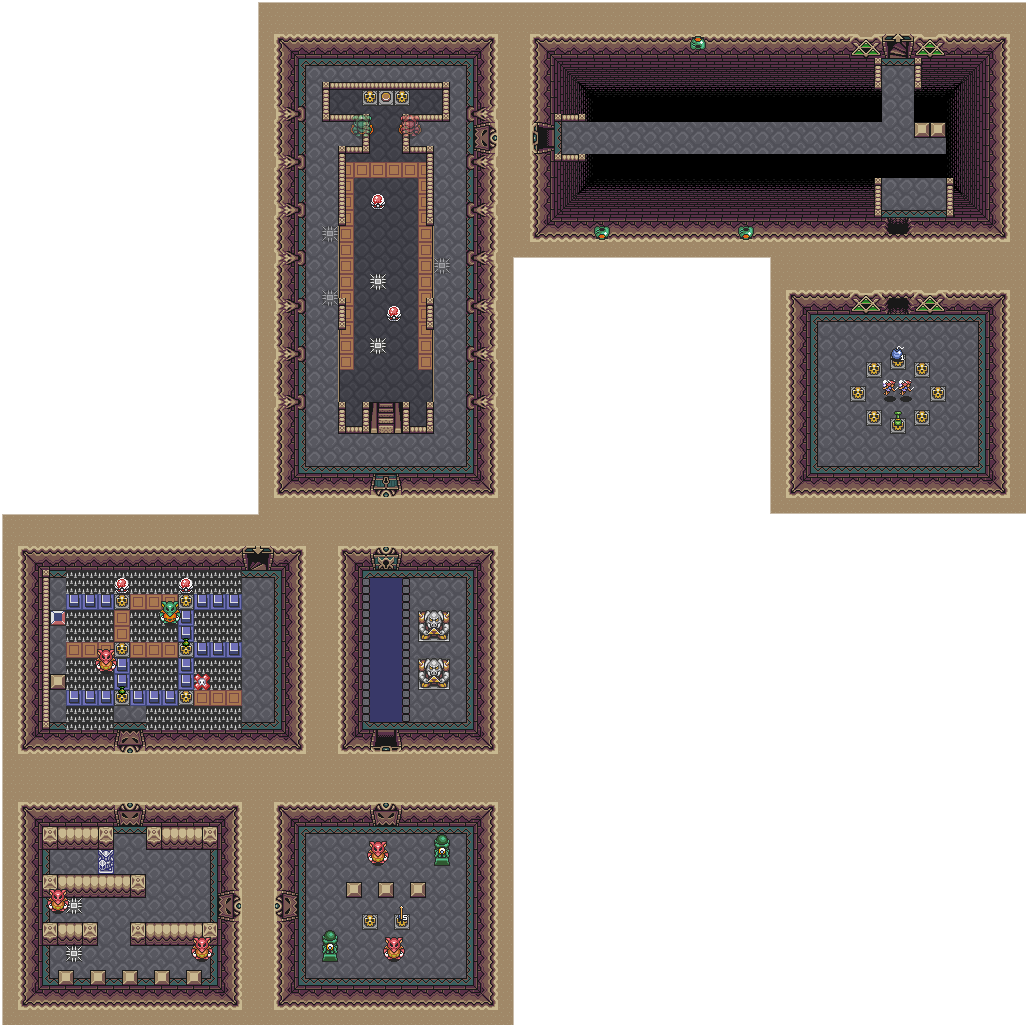
 In continuation of my last blog post where I showed all the overworld locations in the game where you can obtain items, we have our latest edition: The Legend of Zelda: A Link to the Past Randomizer Dungeon Guide. In order to help everyone who is newer to the game, I have edited a couple of maps I had found for use on Ian-Albert.com in order to better assist everyone with finding every possible item location. These maps are only going to show you where the chests are located in the dungeons. I will be doing tutorial videos that I will be putting on my Youtube page if you wish to see how to efficiently access each chest. In Randomizer the items under the pots will still be the same so we have included the locations of anything guaranteed to be dropped from an enemy or anything found under pots. Please Note: Small keys dropped from enemies or under pots are not included on the list for each dungeon as the list is only for potential item locations. Please also note that I have left the chests that are guaranteed to have small keys in them with the image of a small key above them. Hyrule Castle Escape
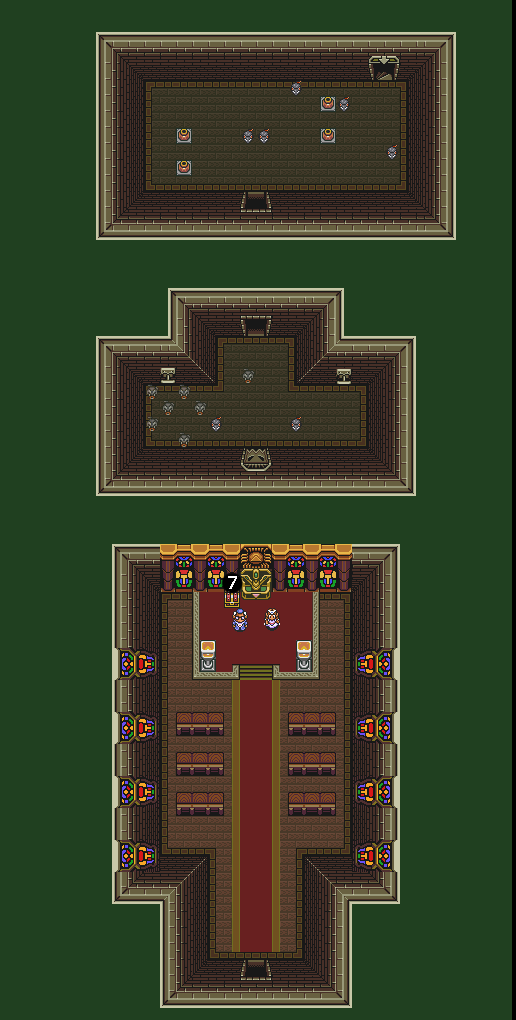
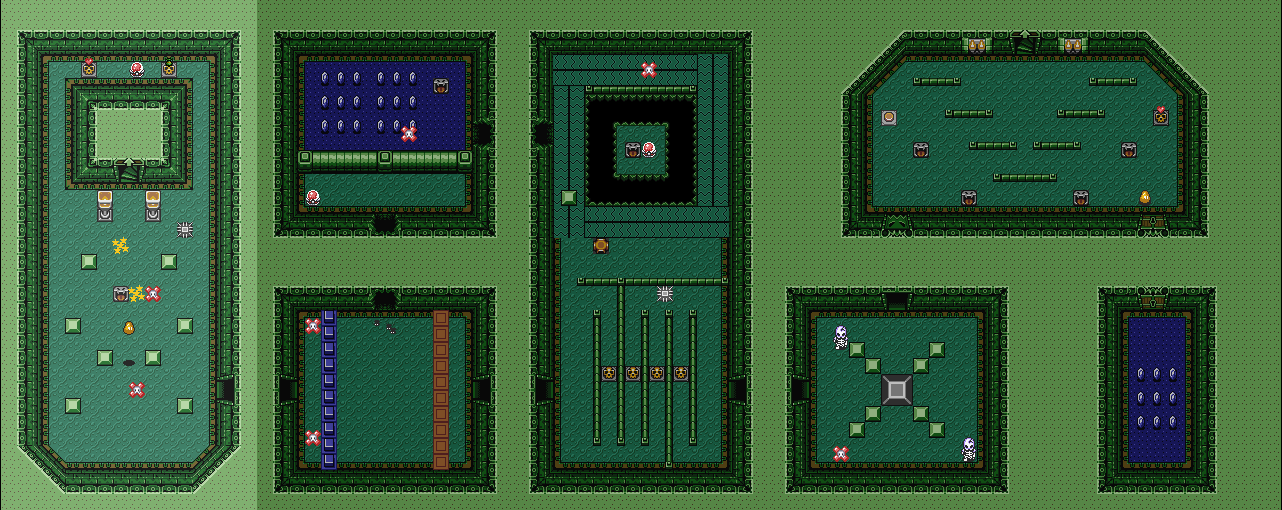
Eastern Palace
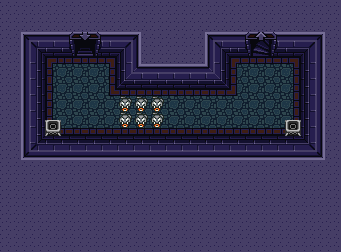
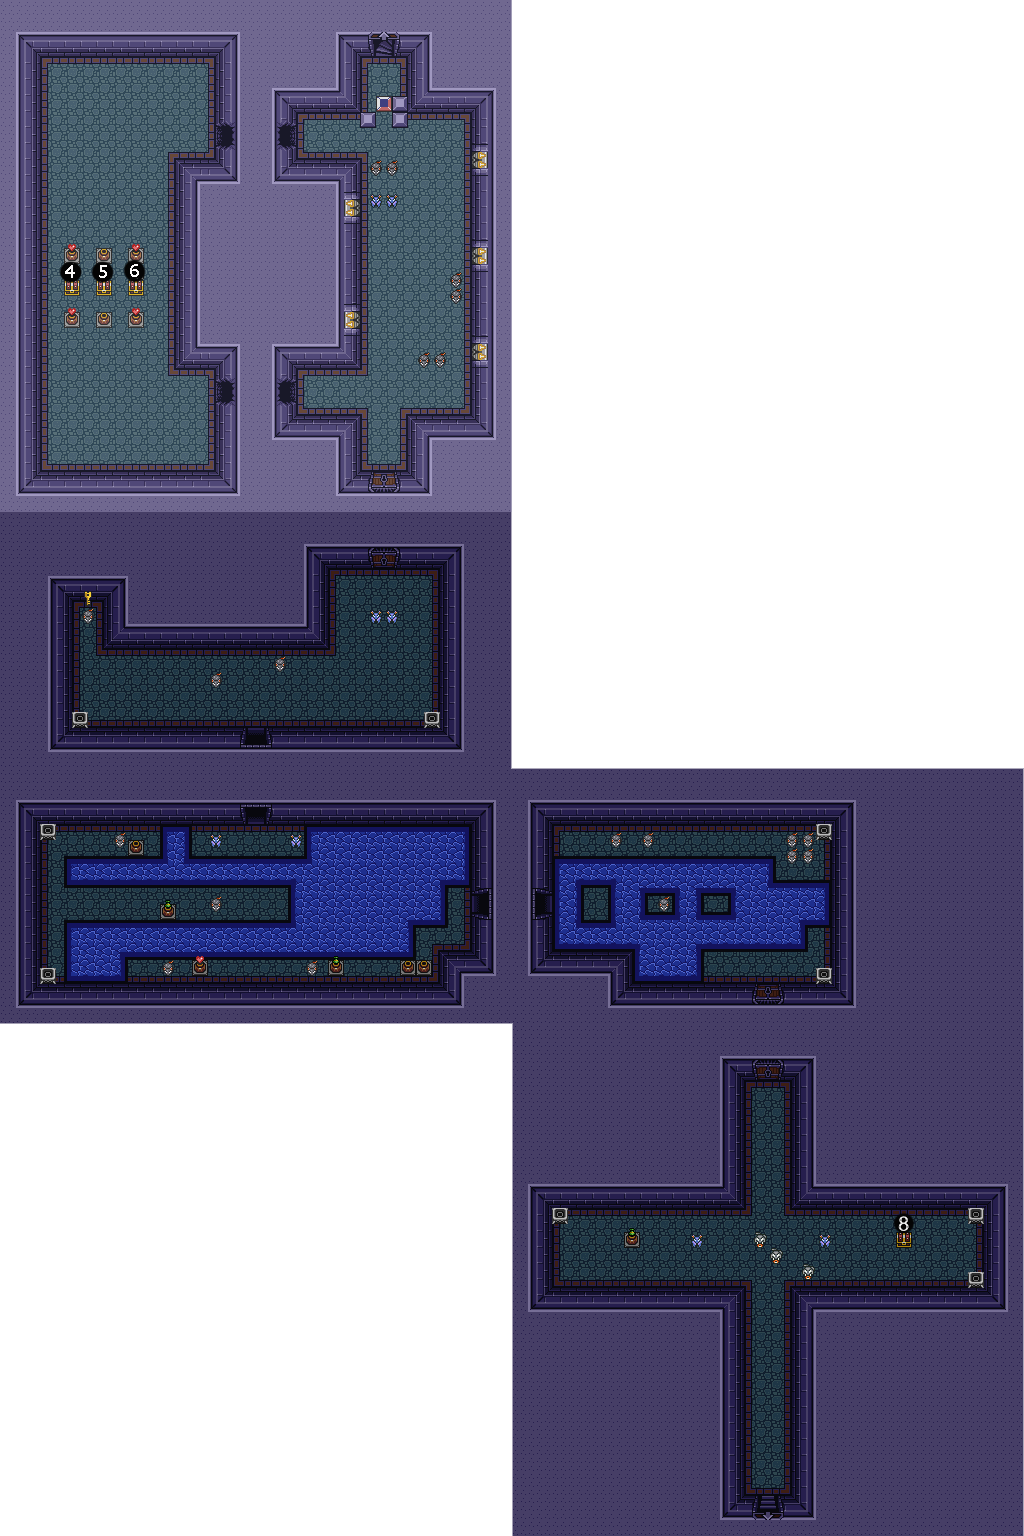
Desert Palace
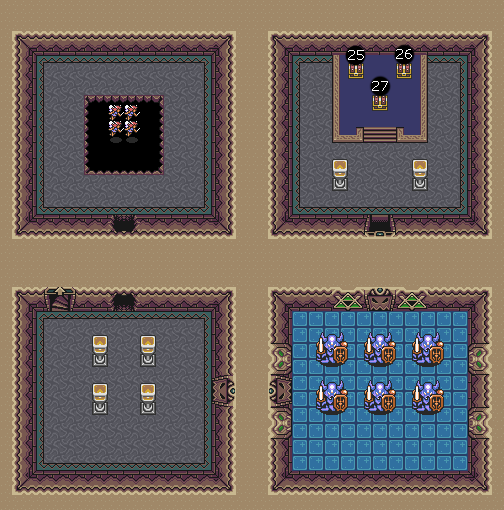
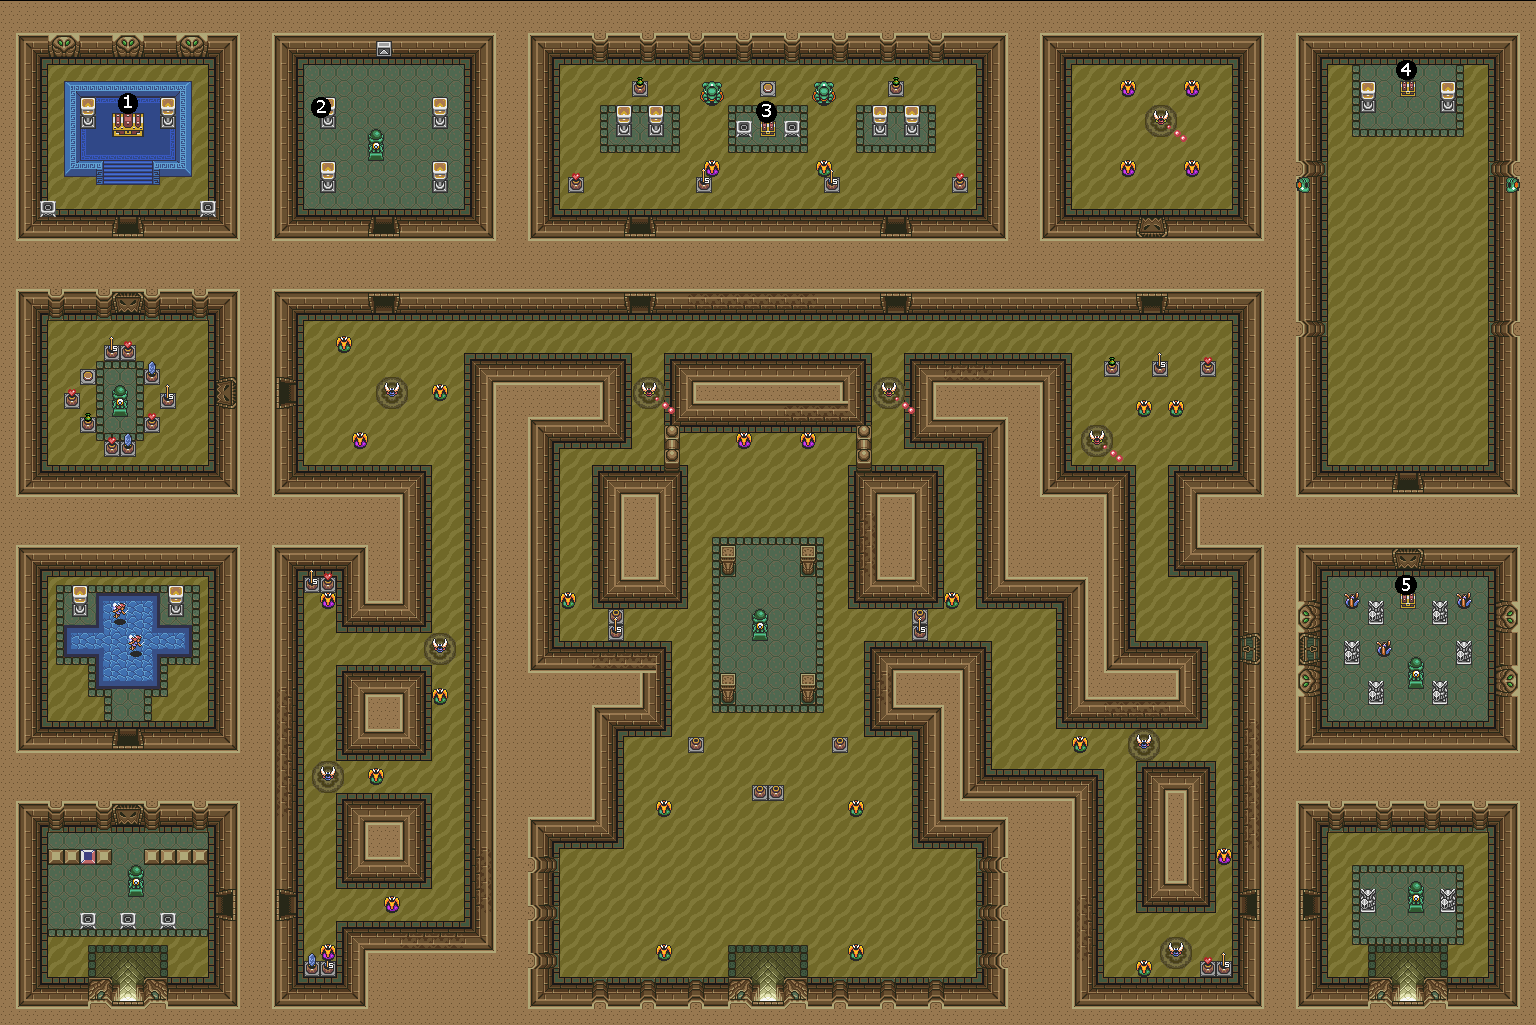 Tower of Hera
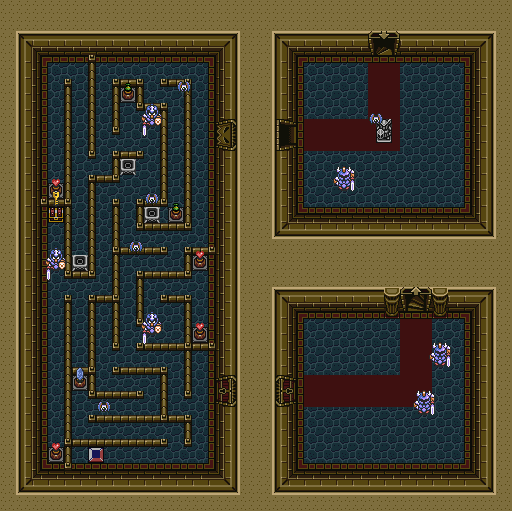
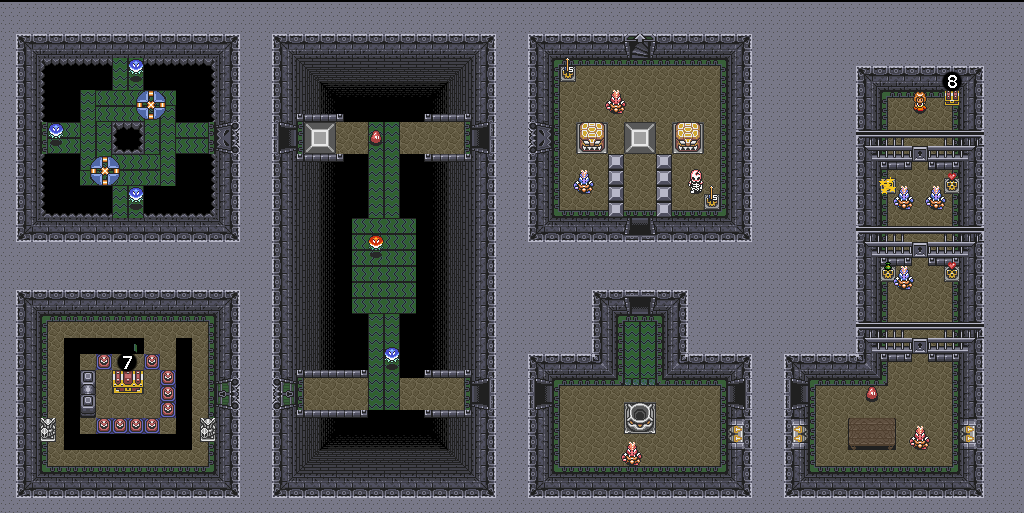
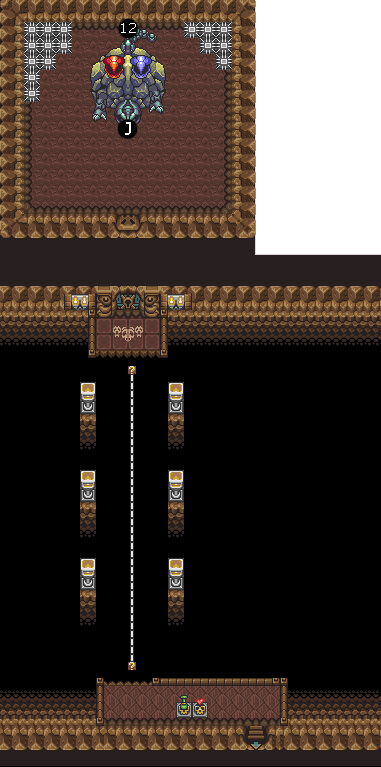
Hyrule Castle - Agahnim 1All chests in this dungeon are guaranteed small keys. Palace of Darkness
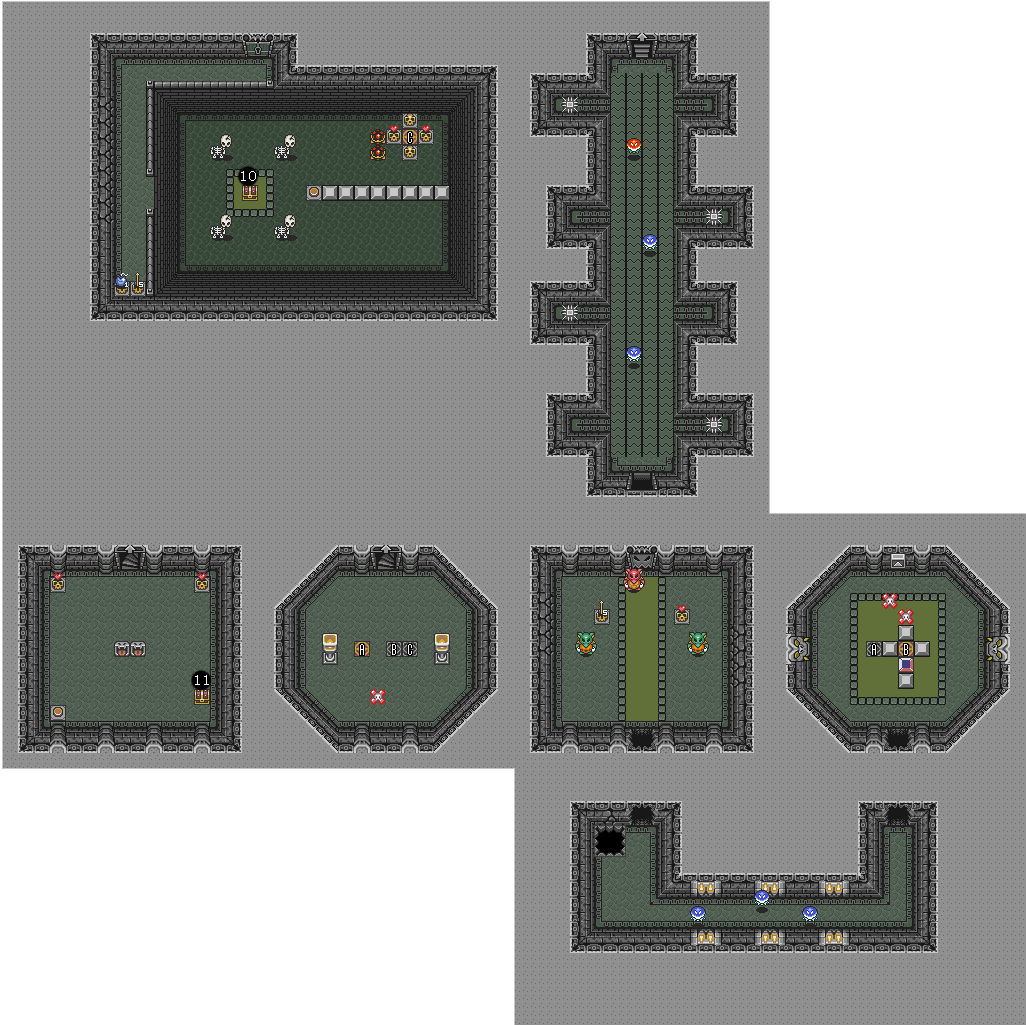
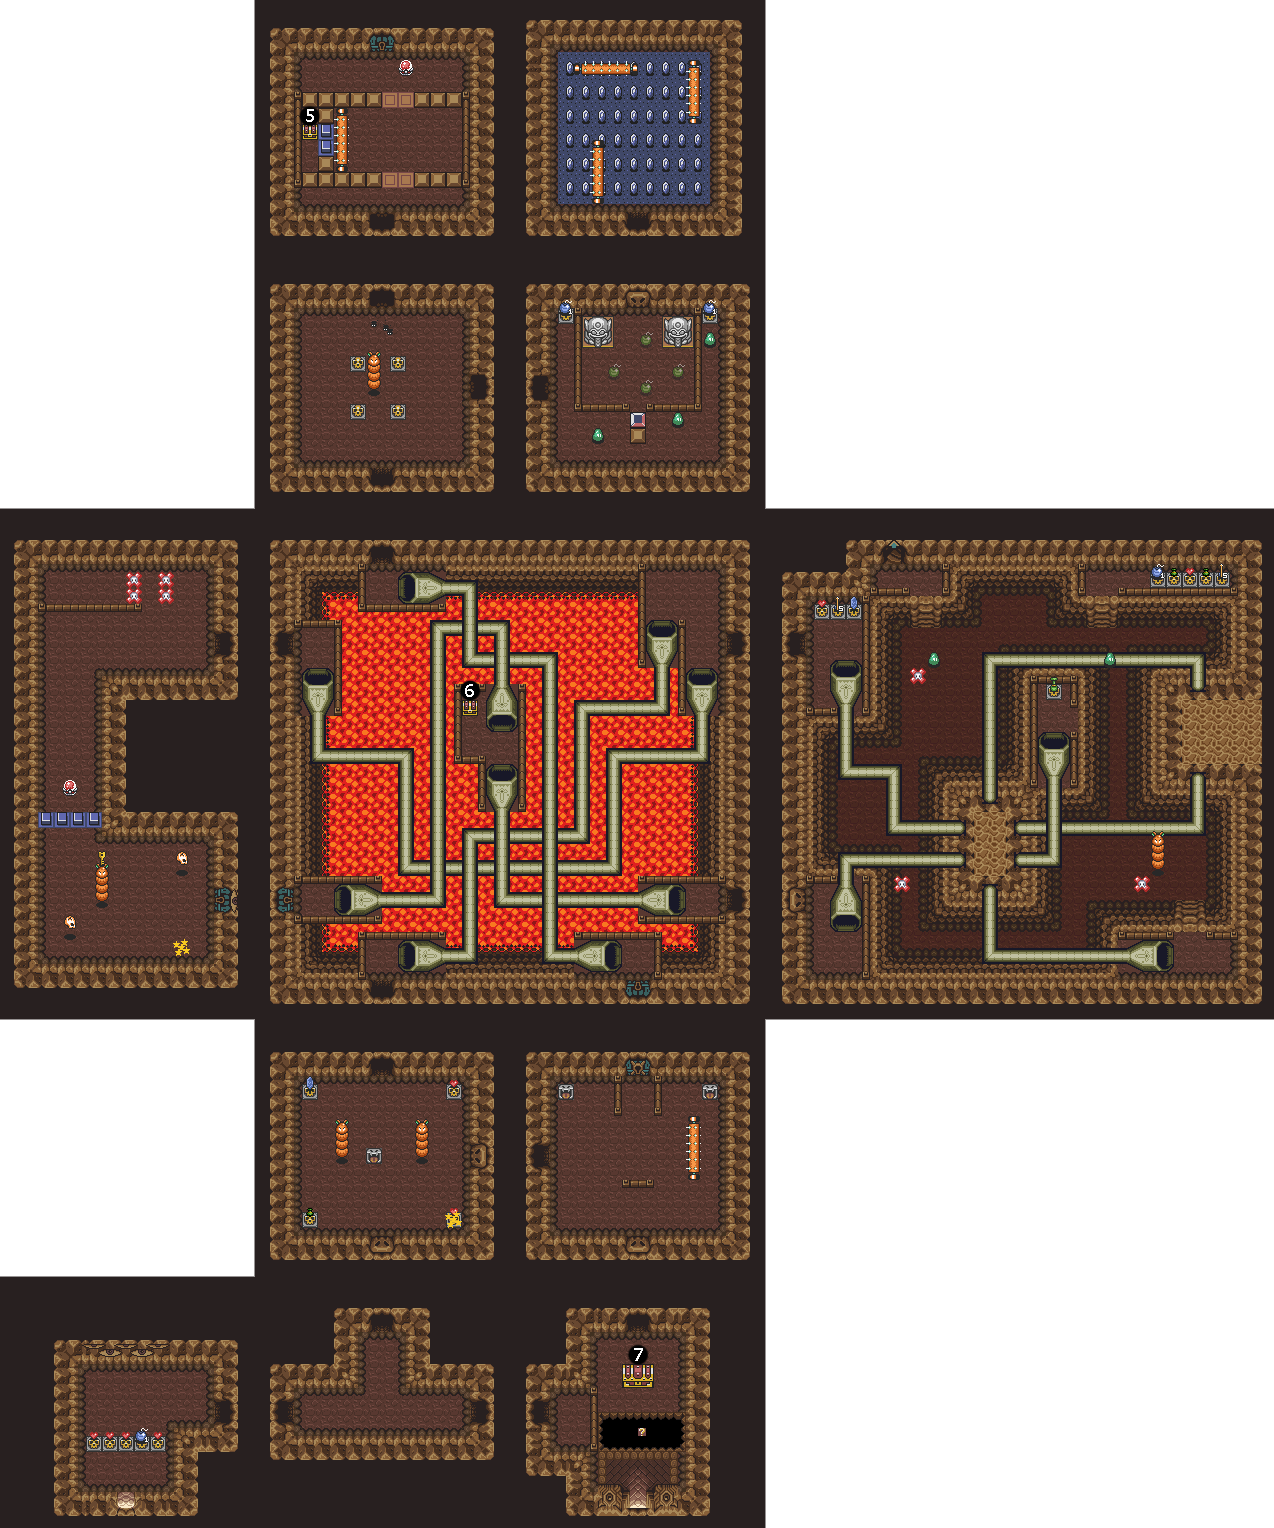
Swamp Palace*
*Note: You do not need the boss key to access this boss Skull Woods*
*Note: You do not need the boss key to access this boss Thieves town
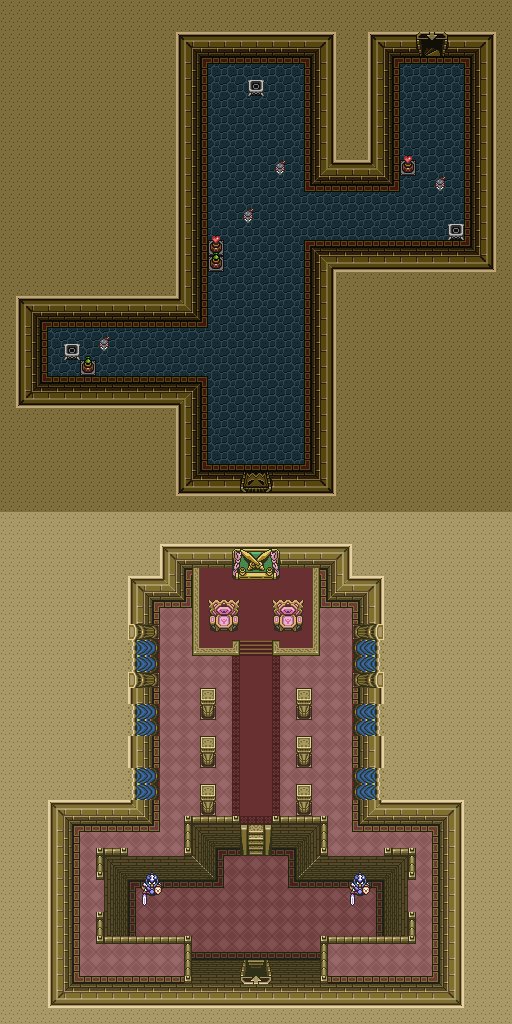
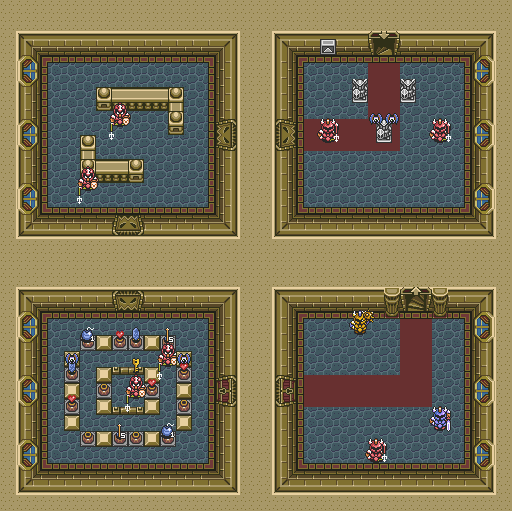
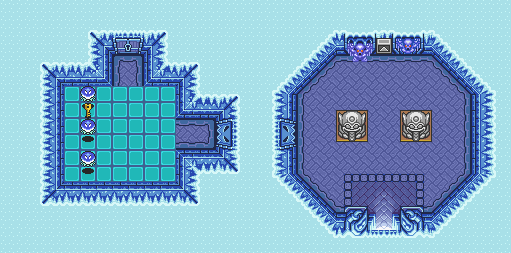
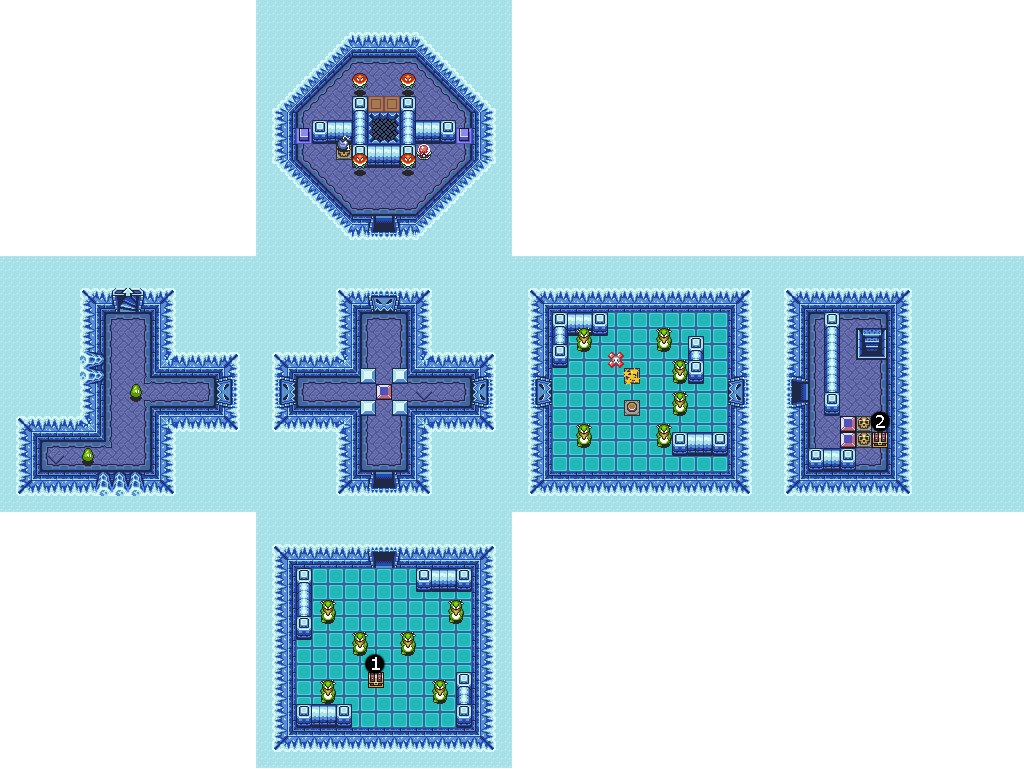
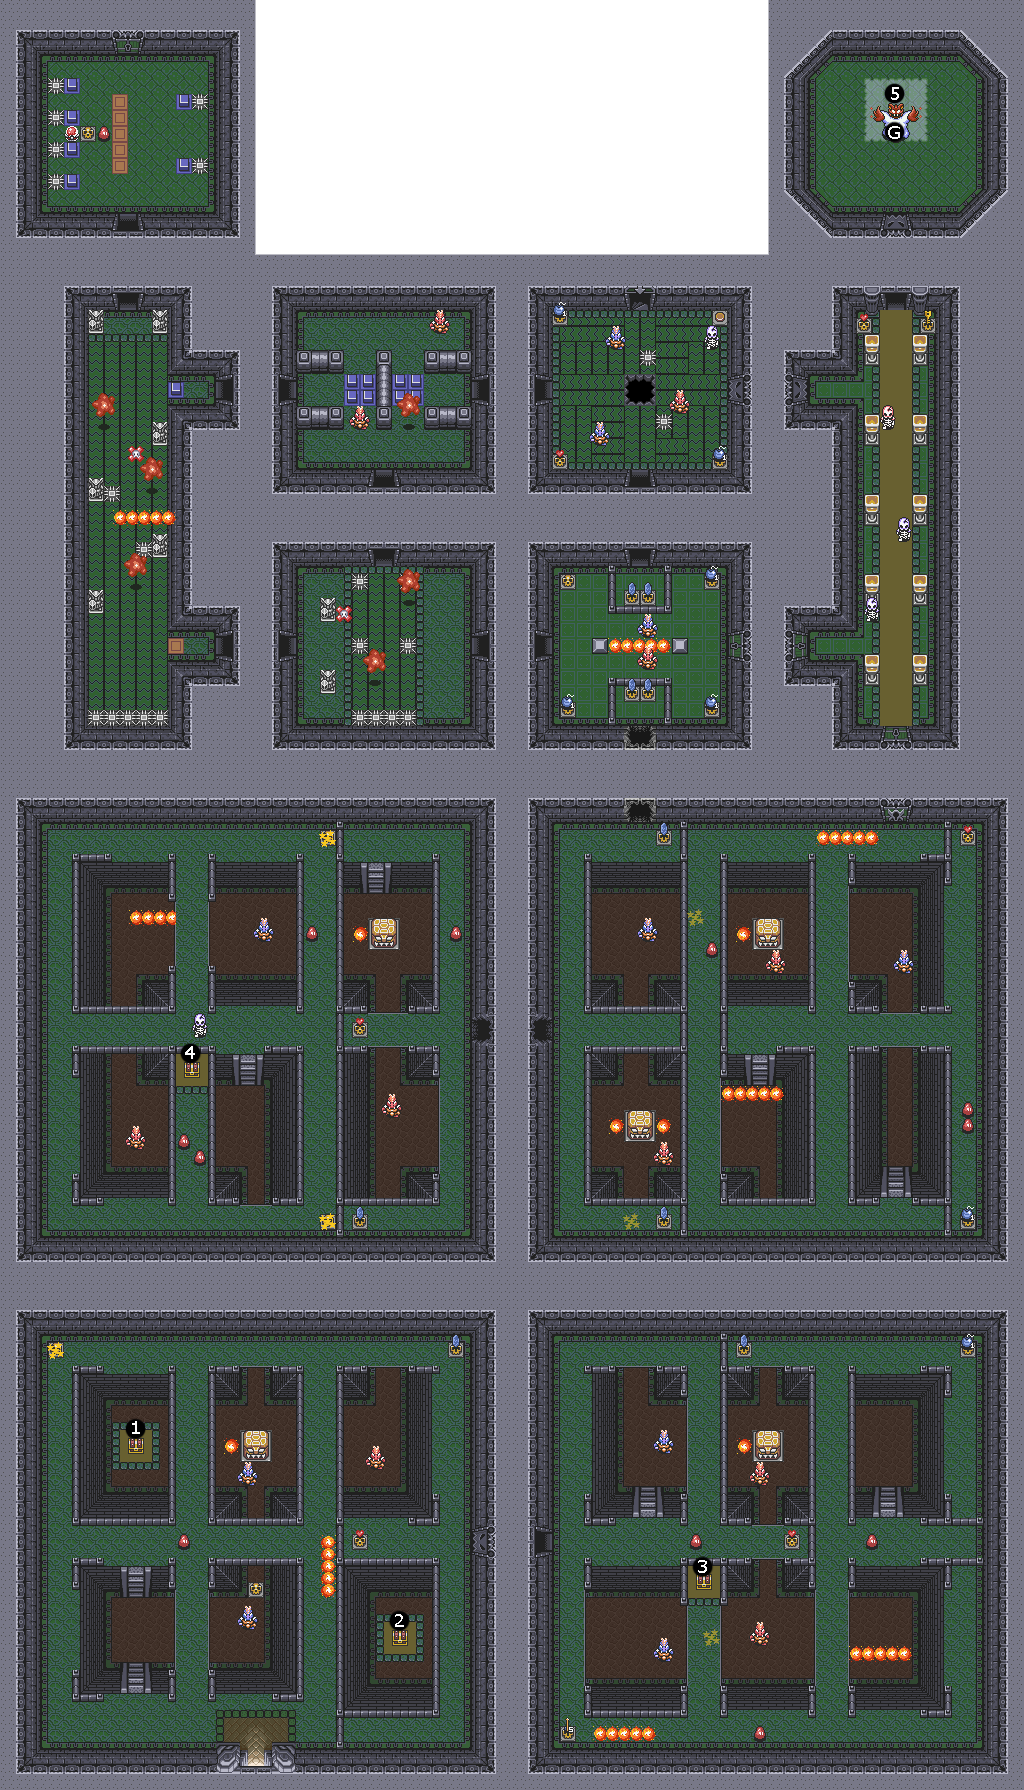 Ice Palace
Misery Mire
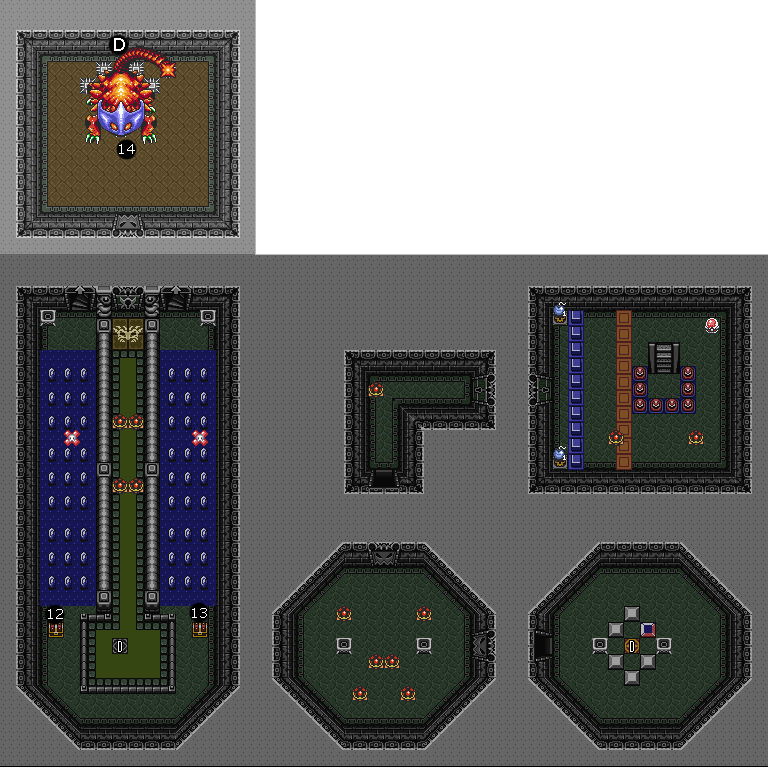
Turtle Rock
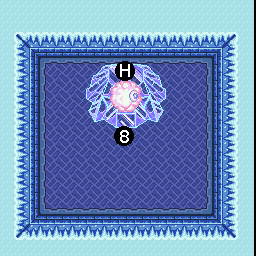
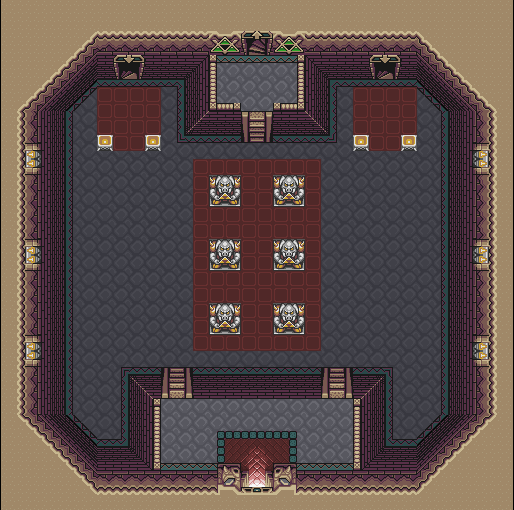
Ganon's Tower
I thank you very much for taking the time to look over this guide. Please leave any questions or comments below if you think I have missed anything or if you have a suggestion for another guide.
|

AuthorThis is me ^ Archives
November 2022
Categories
All
|


 RSS Feed
